What Powershell Cmdlet Can Be Used to Create a New Active Directory Integrated Primary Zone?
To commencement configuring Active Directory from a Windows machine, y'all'll need RSAT tools, which include Server Manager and other vital consoles like PowerShell. From the "Server Managing director," y'all'll be able to monitor your server and add new key roles and features like Advertising DS and DNS— tools necessary to first with Agile Directory.
In this Agile Directory tutorial, you lot'll acquire how to prepare Active Directory from scratch. We'll provide you with footstep-by-pace guidance into installing RSAT to log and manage AD, and nosotros'll also become through the procedure of installing Active Directory Domain Services (Advertisement DS) to gear up an Agile Directory Forest and Domain Controller. Finally, we'll configure the DNS server zones and wrap upward with additional primal settings.
Tabular array of Contents
- Installing RSAT Tools
- Installing and running the AD DS On the Windows Server 2019
- Creating an Active Directory Wood and Domain
- Configure the Active Directory DNS server zones
- Additional Active Directory Setup
one. Setup Active Directory with RSAT
To prepare Active Directory, you'll need to have Microsoft Remote Server Administration Tools (RSAT) running on a Windows auto. RSAT allows Information technology admins to remotely manage the roles and features in Windows Server 2022 and 2016. RSAT includes the Server Manager, Microsoft Management Console (MMC) snap-ins, PowerShell cmdlets, consoles, and additional control-line tools to administer Windows Server's roles and features.
- RSAT is compatible with Windows servers running Windows 10, Windows eight.1, Windows 8, Windows 7, or Windows Vista.
- You can install RSAT 10 only in the full edition of Windows Professional person, Windows Enterprise, or Windows Education versions.
- Y'all cannot install RSAT in Windows Home, Standard edition, or on computers running Windows RT eight.ane
How to install RSAT?
If you take the Windows 10 Oct 2022 update (1809) or later, RSAT is already included equally a set of Features on Need.
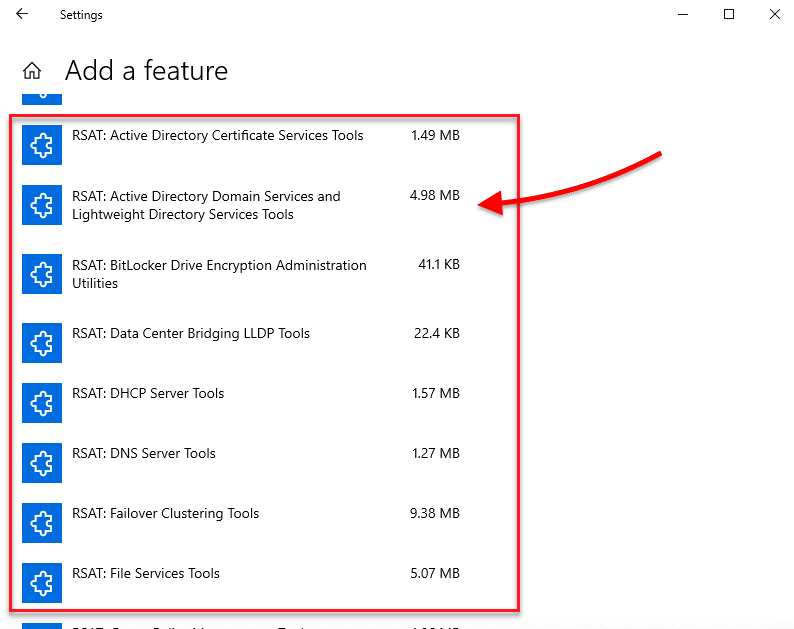
- Get to Settings > Click on "Apps" > Apps & Features > Manage Optional Features > Add Characteristic.
- Curl down, notice, and select RSAT: Active Directory Domain Services and Lightweight Directory Tools. Click on Install.
Prior to the Oct ten update (1809) – Windows viii or Windows ten (1803)
- Download RSAT for Windows 10 from Microsoft's official site.
- Double-click on the installer (.msu) and click on "Install". Become on and accept the license terms and expect for the installation to cease.
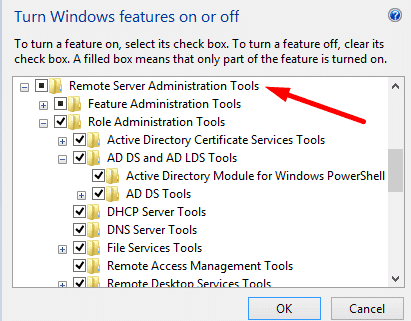
- Go to Control Panel > Programs > Programs and Features > Plough Windows features on or off.
- Scroll downwardly, detect, and expand the "Remote Server Administration Tools".
- Click on Function Assistants Tools. Ensure that "Advertizement DS and AD LDS Tools" are selected. Click on "Advertisement DS and Ad LDS Tools" to verify that Active Directory Module for Windows PowerShell and Advertising DS Tools are checked.
ii. Installing and running the Advertizement DS On the Windows Server 2019
Active Directory Domain Services (Advertising DS) provide the cadre Active Directory functions that manage users and computers. The server running the AD DS office is considered the Domain Controller (DC).This server authenticates and authorizes all users and computers within a Windows domain. It also assigns and enforces security policies and pushes software installs and updates.
To set up Agile Directory DS on a Windows Server 2019, yous'll need the post-obit:
- The administrative privileges on the server.
- Server with a static IP address.
- Knowing the organizational naming standards.
How to install the Ad DS role
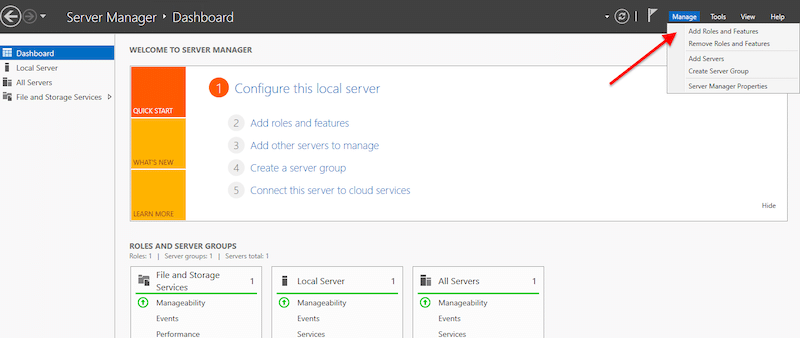
- Open Server Manager > Manage > Add Roles and Features.
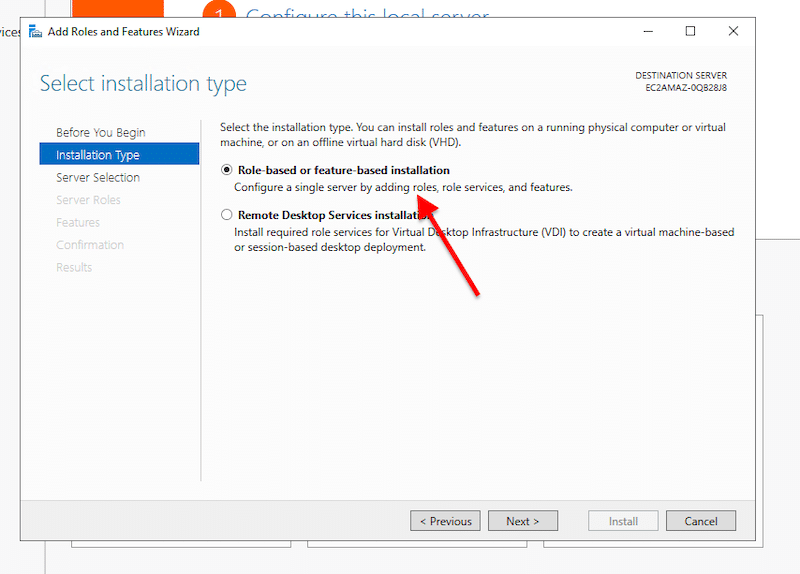
- On Installation Type, cull the "Office-based or feature-based installation" and click on Next.
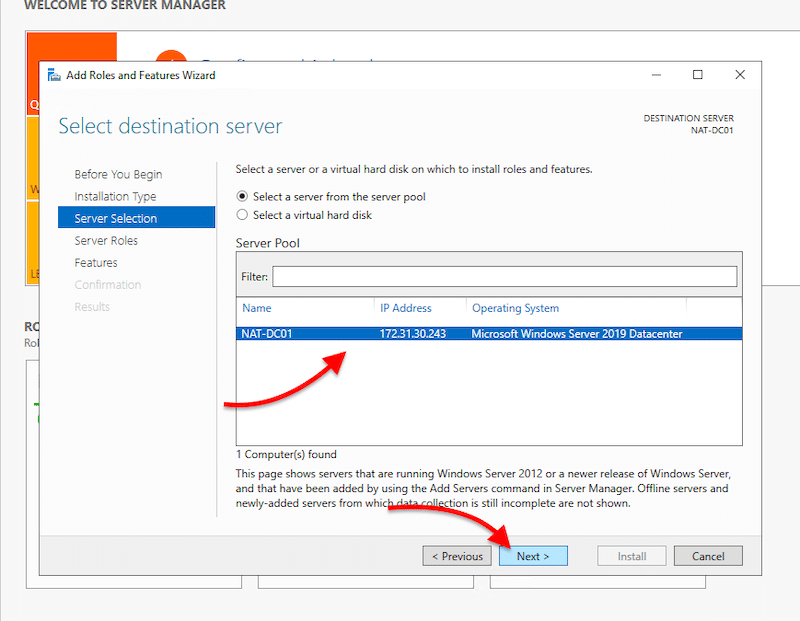
- On Server Selection, you'll need to select your local server (or whatsoever remote server) where you wish to install the AD DS role. This option shows our local server, NAT-DC01, with an IP and the OS version.
- Go ahead and select your server and click on Side by side.
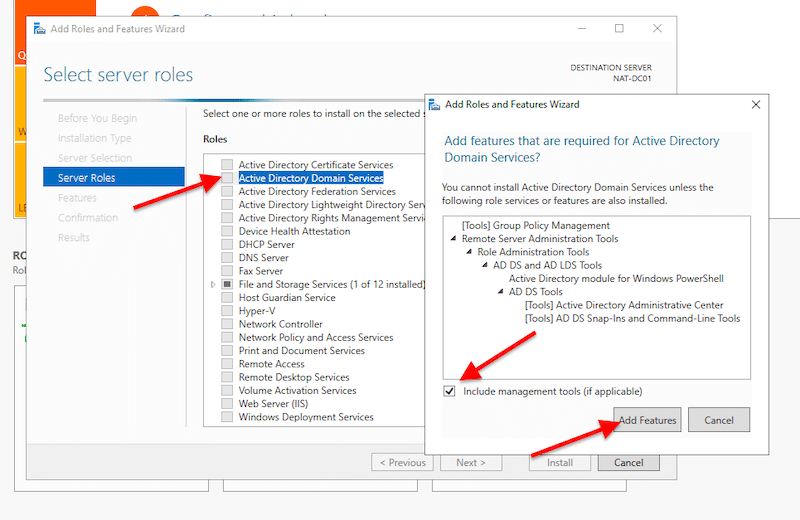
- On Server Roles, observe and select "Active Directory Domain Services". Once you lot choose that option, a new pop-upwardly window will appear. This window shows the features required for Advertizement DS that yous will need to include. Become ahead and click on "Include management tools" and click on "Add Features".
- If your AD Server also has the DNS server role, you'll need to select it here. Whorl down to "DNS Server" and include the required features. For your server to exist a DNS server, you'll demand to take a static IP accost.
- On Features, Advertizement DS, and DNS Server, click on "Adjacent".
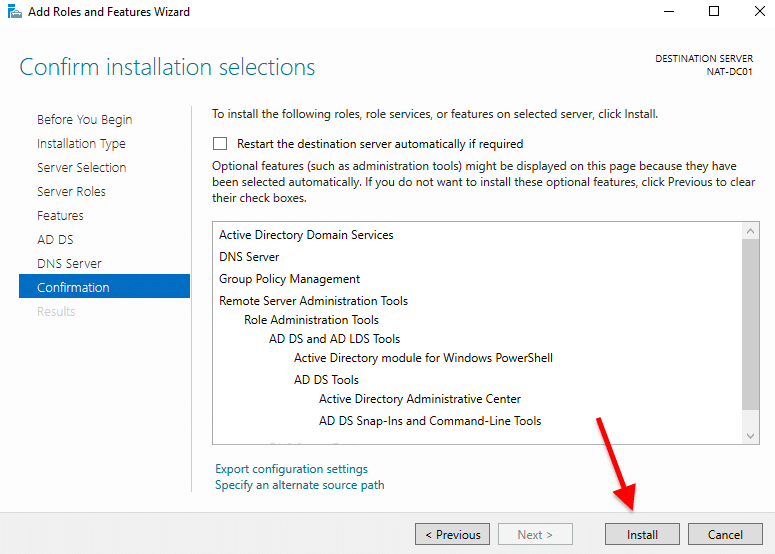
- On Confirmation, verify your configuration and click on "Install".
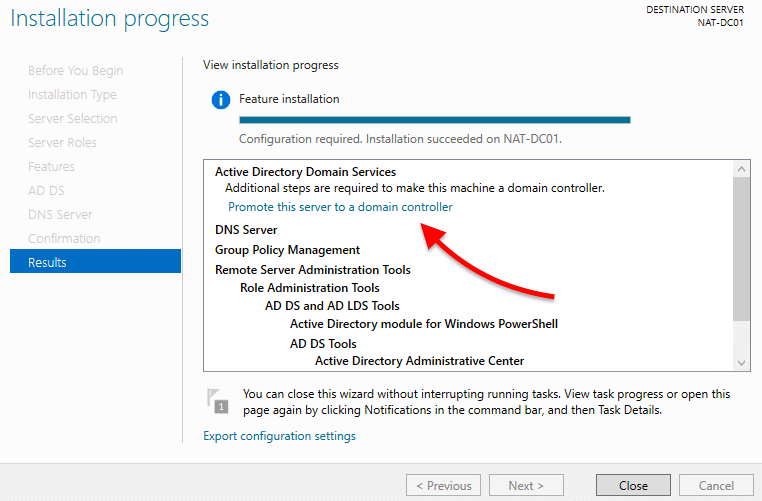
- Look for your installation to finish. Don't close the "Results" step on the Installation sorcerer yet.
three. Creating an Agile Directory Forest and Domain
Once the installation is booming, andbefore closing the Installation wizard, go ahead and select "Promote this server to a domain controller".
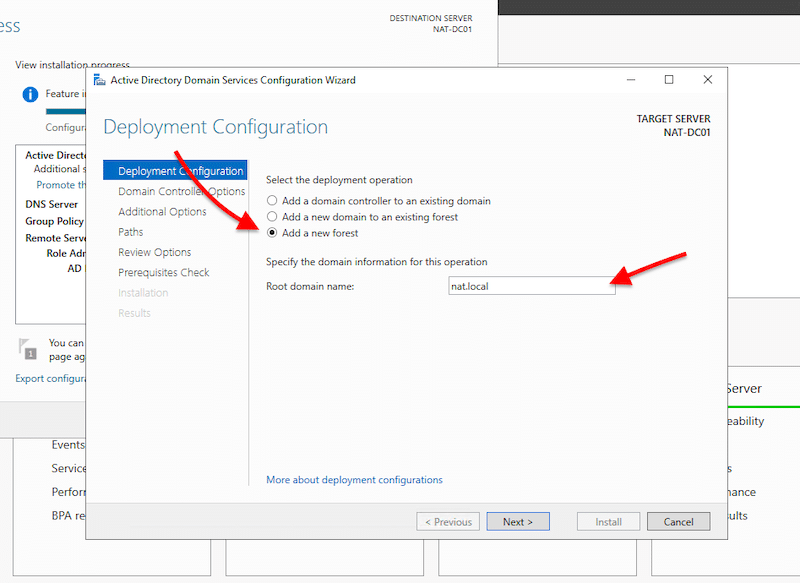
- A new Agile Directory Domain Services Configuration Wizard volition open up. This contains iii options for deployment: "Add a domain controller to an existing domain", "Add a new domain to an existing forest", or "add a new forest". Since we are starting from scratch, nosotros are going to create a brand new forest.
Note: Before creating your first Domain Controller, you'll need a forest, and earlier a woods, you'll need a valid root domain. All Active Directory clients apply the DNS protocol to discover domain controllers, and all domain controllers besides utilise DNS to communicate. An case of an Advertizement root domain proper noun can be something like "nat. local" or "nat-internal.company.com," where "nat-internal" is the internal AD domain name, and "company.com" is the external resources proper name.
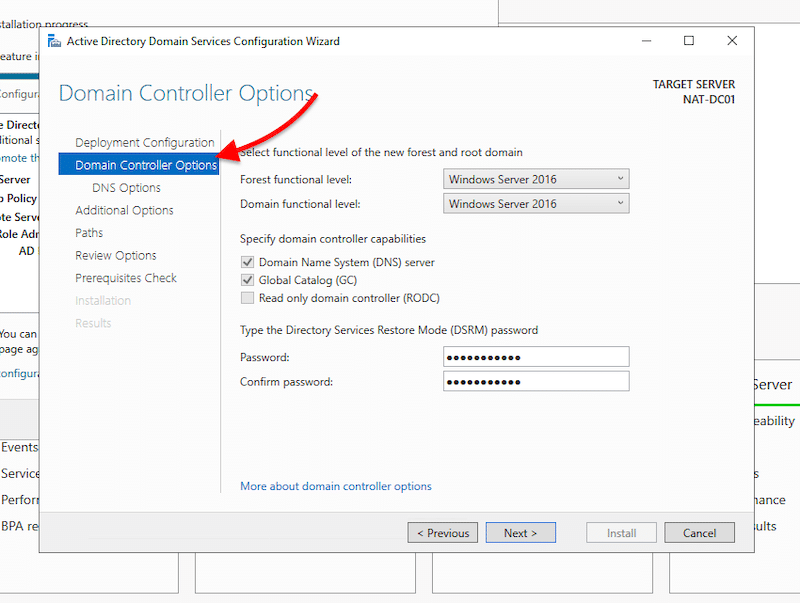
- In the next screen: "Domain Controller Options", you'll be able to select the functional level of the new forest and root domain.
Annotation: The functional levels are the controls that specify the AD DS features used in the domain or forest. Every bit of Nov 2020, the latest available levels are those of Windows Server 2016.
- Specify the domain controller capabilities. Since this is the first AD domain controller, check the DNS server and Global Catalog boxes.
- Give the Directory Services Restore Manner (DSRM) a countersign. And click on "Next".
- SkipDNS Options. No demand for DNS Delegation now.
- In Additional Options, y'all'll see the NetBIOS domain proper noun taken from the root domain. But you are also free to alter it.
- InPaths, you'll be able to specify the location of the AD DS database, log files, and SYSVOL folders.
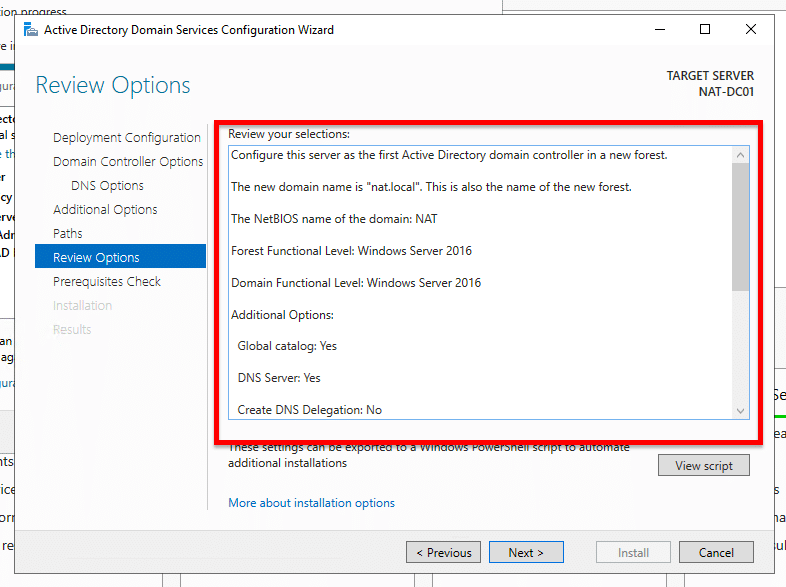
- Inreview options, you'll be able to cheque your configuration and go back if you desire to brand any changes before installation.
- The Prerequisites Cheque will show you a checklist with warnings or disquisitional alarms.If the bank check passes, it will show a dark-green light, and you'll exist able to install Advertizing DS with the new domain controller and wood. You can take care of these warnings later on.
- Click Install. The server will install and restart automatically.
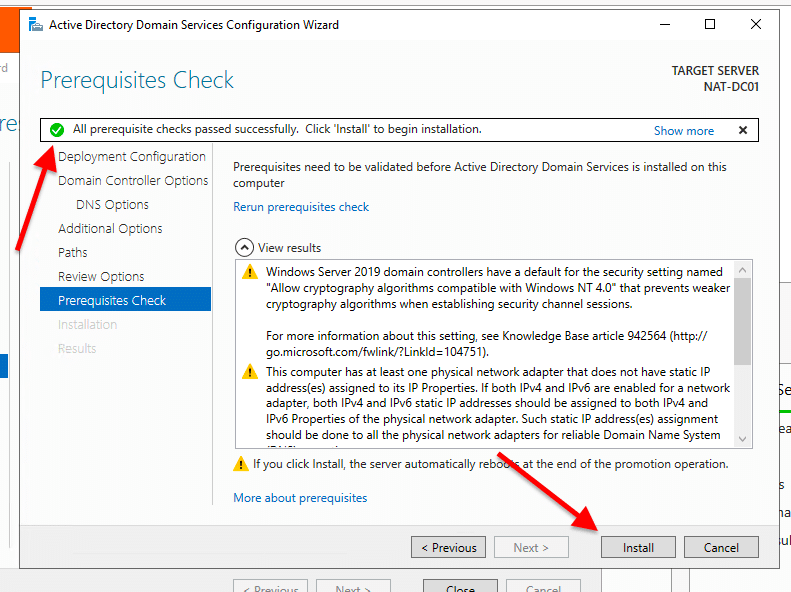
Note: If yous got a similar message as mine (this server has one physical network adapter that does not have a static IP accost), it is because you didn't configure the static IP. To do this, go to Control Panel >Network & Internet > Network Connections > Select Ethernet adapter > right-click and go to Backdrop. In Ethernet Properties, select IPv4 and click on Properties.
- Select "Use the following IP address". Then, according to your IP addressing scheme, give your server the IP address, subnet, and default gateway information, along with DNS information (your IP).
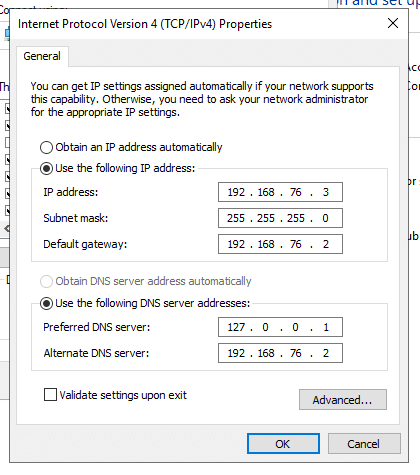
Equally you might notice, the server is using 127.0.0.one (loopback IP address) considering the server itself is acting as a DNS server. Therefore, y'all'll demand to change "Preferred DNS Server" to the static IP address of your server (192.168.76.3, for example).
Verify your configuration
- Access the Advertising DS management console. Go to "Server Manager" and click on "Tools".
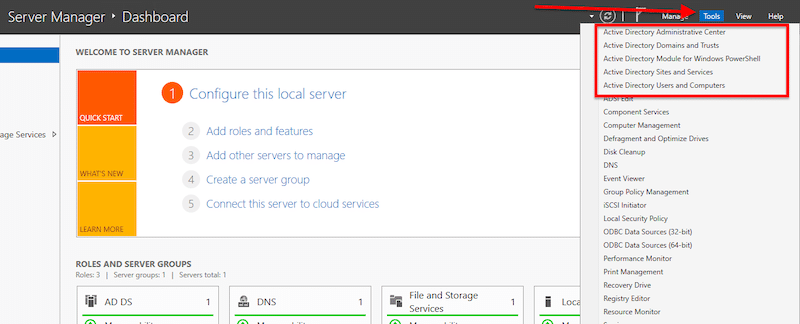
- Open "Active Directory Users and Computers" to ensure the naming and functional levels of your new DC are right. Side by side, explore your domain controller (nat. local in our example) by right-clicking on it and opening "Properties".
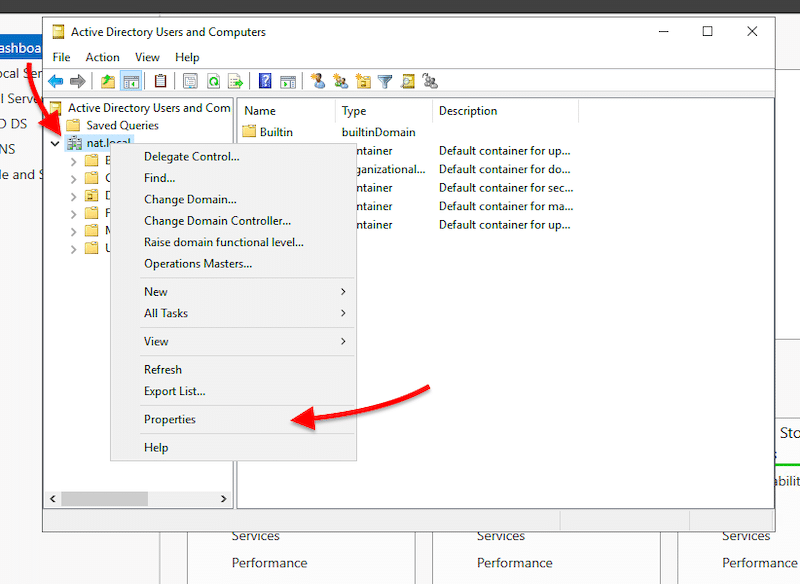
- On properties, verify your DC proper name and functional level.
4. Configure the Active Directory DNS server zones
Y'all already installed Advert DS, the DNS role, and created a new forest and DC. Now you'll only need to configure the DNS zones.
A DNS zone is formed by resource records (IP blocks and naes) used to resolve DNS queries. The most common zone type in Agile Directory is the Active Directory-integrated DNS zone. To learn more than almost Active Directory and zones, cheque this great guide to terminology, definitions, and fundamentals.
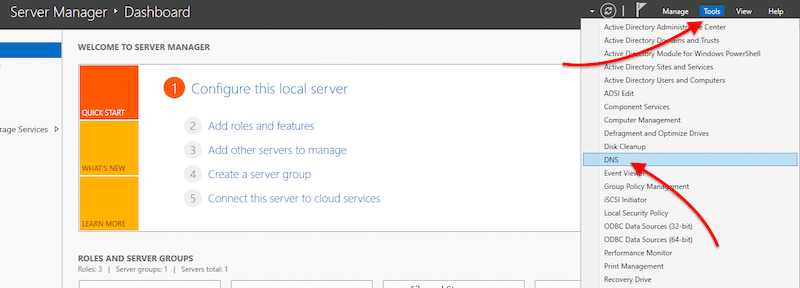
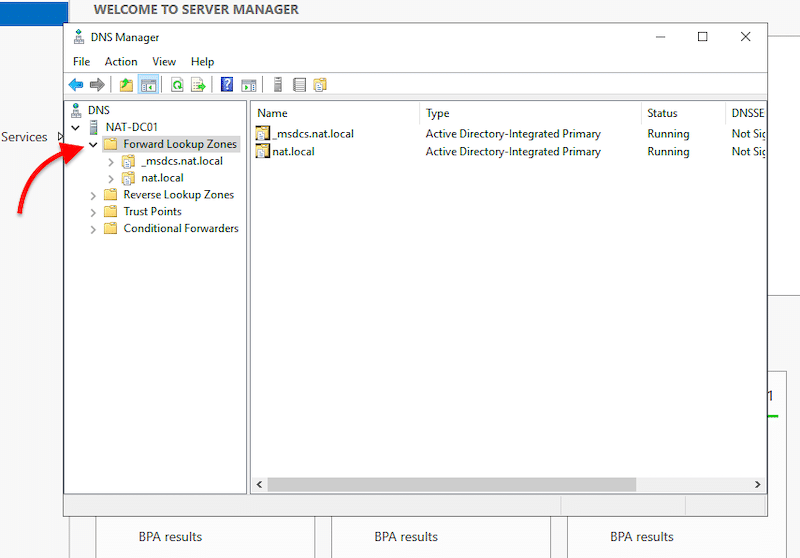
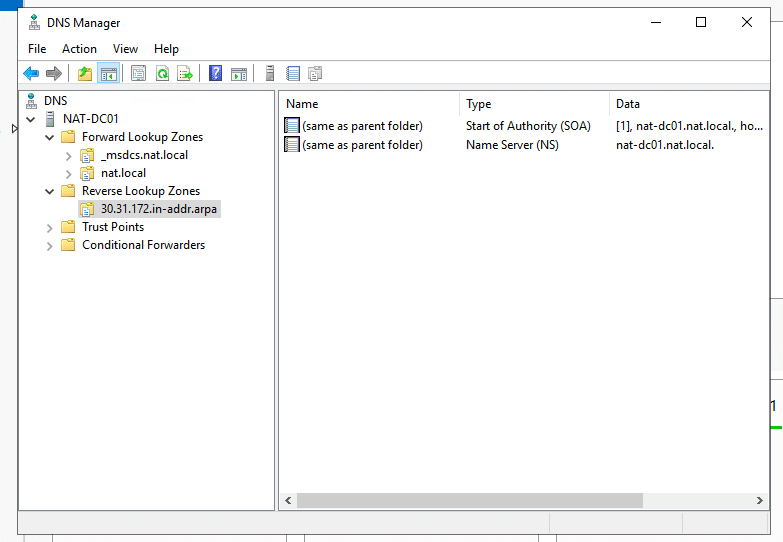
- Open "Server Manager" > Go to "Tools" > Click on "DNS".
- Within DNS, aggrandize your server and open "Forrard Lookup Zones". Yous'll detect two Advertizing integrated primary DNS zones. The "nat. local" is the root domain proper name we assigned in the previous AD DS configuration procedure. The _msdcs zone is a separate zone stored in the application partitioning. This zone is replicated to every DC that is a DNS server.
- As you notice, the Forward lookup zones are already there, but at present, you'll demand to create a contrary lookup zone.
Note: Frontwards Lookup Zones vs Contrary Lookup Zones? Frontward lookup zones resolve names to IP addresses, while reverse lookup zones resolve IP addresses to names.
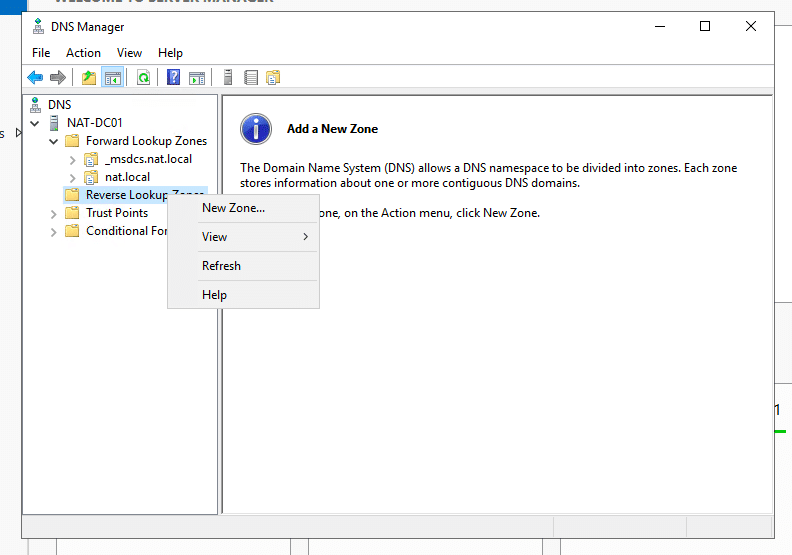
- Now, allow's configure the reverse lookup zone. First, Right-click on "Reverse Lookup Zone" and click "New Zone…"
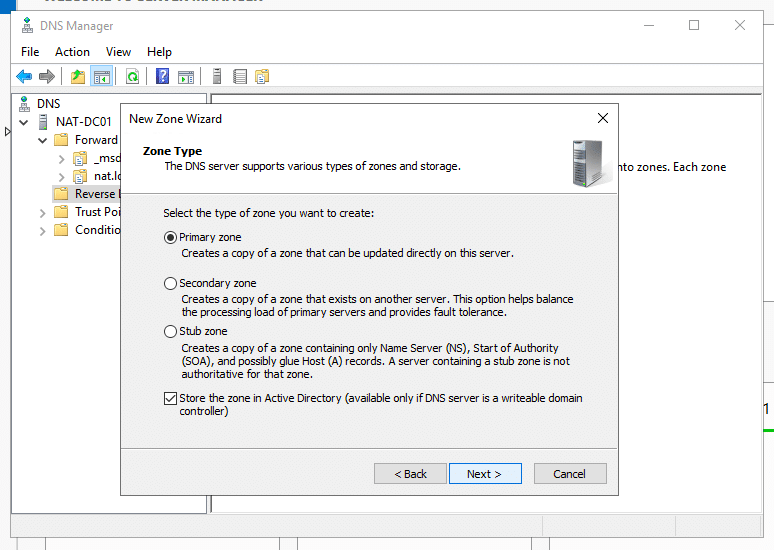
- In the New Zone Wizard, get out the zone type every bit "primary zone" and check the "Store the zone in Agile Directory" box. Then, click "Side by side".
- In "AD Zone Replication Scope," how do y'all desire DNS data to be replicated? select, "To all DNS Servers running on domain controllers in this domain: (your domain proper name)".
- On the adjacent screen, select "IPv4 reverse lookup zone" and click "Next".
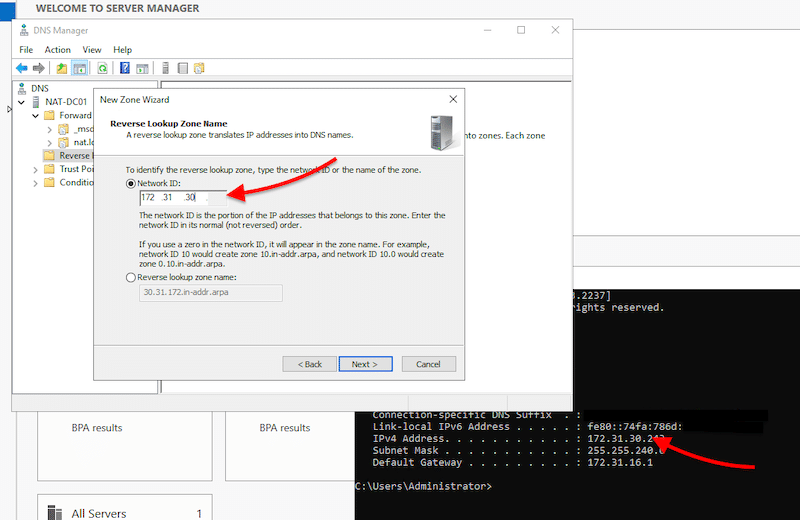
- Specify the Network ID of the reverse zone to help place the reverse lookup zone. These first 3 octets are the network ID of your server.
- If you don't know your server IPv4 accost, use the "cmd" utility and the "ipconfig" command.
- Click on "Side by side" > "Next" > and "Stop".
- Cheque your new opposite lookup zone. Within, you lot should run across two DNS resource records, SOA and NS.
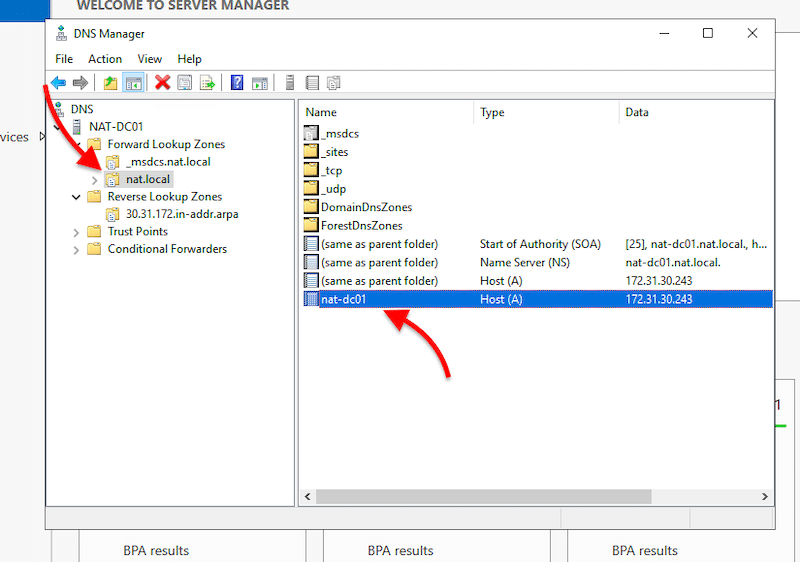
- Update your A record.The A record, too known as the host tape or DNS host, is in your domain's DNS zone file. It makes the connectedness between domains and matching IP addresses. In other words, the A record contains the hostnames with their associated IPv4 addresses.
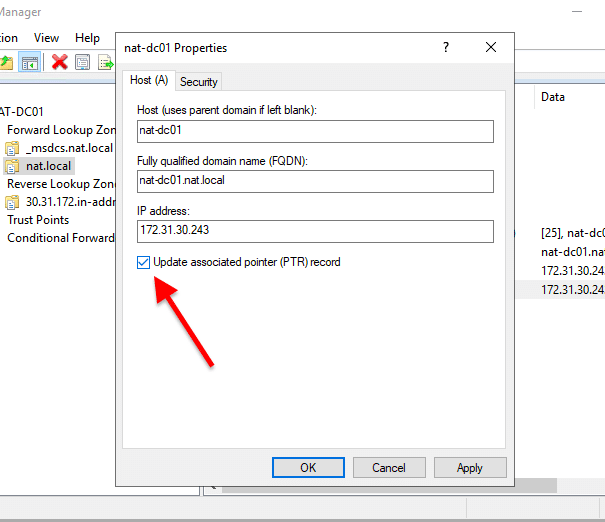
- To enable the contrary lookups, yous'll need to allow the Pointer (PTR) Tape. The PTR record creates a pointer that maps the IPv4 address to a hostname.
- Right-click on the Host A record and click on "Backdrop". A new "Properties" window volition appear. First, check the box, "Update associated pointer (PTR) tape". Then, click on Apply > Ok.
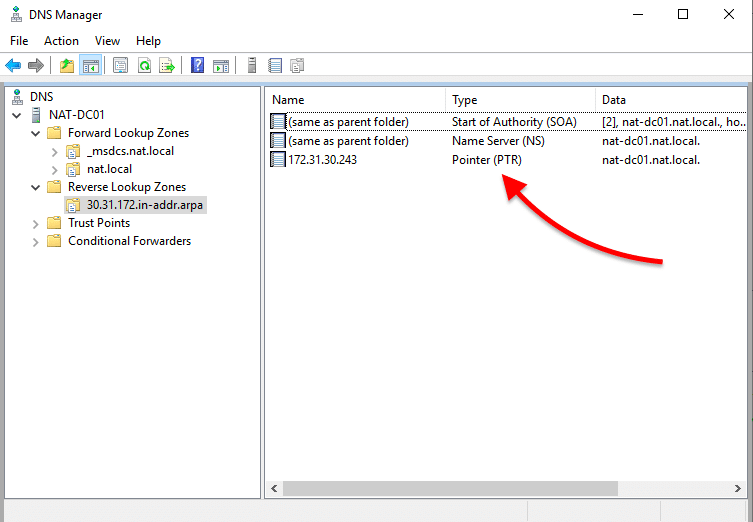
- Verify your reverse lookup zone. If y'all don't see the PTR tape in the reverse lookup zone, y'all'll need to refresh. Right-click on the blank infinite and click on "refresh". The new PTR record should announced.
Rename your Advertizement Domain Server
Optional: If you want to configure a new DNS server, yous'll need to rename your current Domain server and create new zones.
- Open DNS Manager, open up your server, and aggrandize "Forrard Lookup Zones". Now, you lot'll need to create two more zones, then go ahead and right-click on "Forward Lookup Zones" and click on "New Zone".
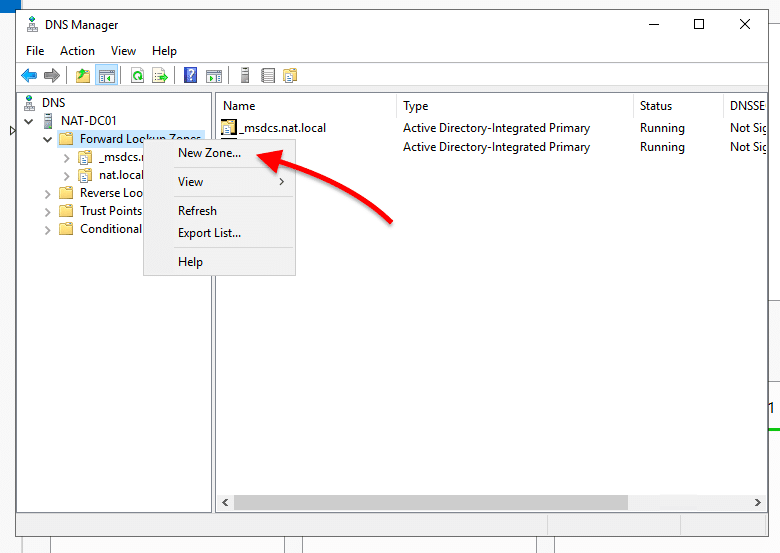
- This will open up the "New Zone Wizard".
-
- In Zone Type, select "Principal Zone" and bank check on the box "Store the zone in Active Directory".
- In Advertizement Zone Replication Scope. Select how you want DNS data to be replicated.
- Give your DNS a zone name(netadmintools.com, for case).
- Leave Dynamic updates by default, and click on next.
- Exercise the same for the 2nd zone name, only change the naming and replication scope. For the name employ an underscore sign (_) + msdcs (for case, _msdcs.netadmintools.com), and for the replication, use the option: "to all DNS servers running on domain controllers in this wood: … "
- Yous'll end upwards with two new DNS zones.
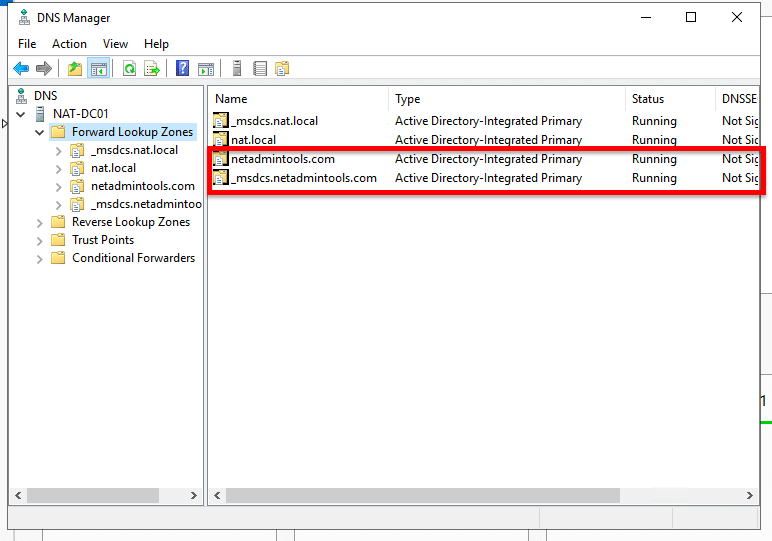
- These two zones are doing nothing now, equally each DC in the forest is still using the former zones.
- You'll demand to rename the Active Directory domain proper name. You can employ the PowerShell control-line utility "Rendom /listing" to listing the naming context in the forest in XML format.
- Open the XML file and replace the DNS proper name for each Domain Controller in the forest. Then go on to upload the XML file to the wood partition using "Rendom /upload". To brand the DC change, issue a "Rendom /prepare" and "Rendom /execute" and restart the server.
v. Additional Active Directory Setup
Beneath are 2 disquisitional additional Agile Directory setups.
Adding a new Domain Controller to an Existing Root Domain
- Make sure both domains have connectivity.
- Create a new domain. Go to Add together Roles and Features, select role-based or feature-based installation, and select the local server. On server roles, option the Agile Directory Domain Services.
- Before closing installation, choose "promote this server to a domain controller". In the next screen: "Deployment configuration," select "Add a domain controller to an existing domain". Select your domain through name or credentials.
- On additional options, select "Replicate from" and "your root domain controller". Then, get ahead and install it.
- Change the DNS server of the new domain controller to the core DNS server.
Create a new Active Directory Users, Computers, or Groups
- Go to Server Manager > Local Server > Tools > Active Directory Users and Computers.
- Right-click on your domain name (or within whatsoever OU) > "New" > Users, Calculator, or Group.
- If you are creating a new user, you'll need to add together the first and final name, the login proper name, and the password. If you brand a new Group, give it a new proper noun.
- To add the new user or computer to the new group, right-click on the new user, "Add to a group" > Go ahead and find and select the grouping.
Source: https://www.netadmintools.com/active-directory-setup-guide/
0 Response to "What Powershell Cmdlet Can Be Used to Create a New Active Directory Integrated Primary Zone?"
ارسال یک نظر