The Over the Hill Gang Rides Again Cast
Every boss in Elden Ring, and how to vanquish them
Elden Band bosses are all over the place. They're tucked into caves, guarding castles, and deep, deep undercover. Information technology can be overwhelming when you lot're starting out, there are then many bosses to choose from. Only with some planning and a practiced strategy within the fight, you lot can flake away any boss in the game.
The main bosses are a lot tankier than other Souls games, and it feels like Elden Ring multiplayer was intended to exist a large focus. Your power increment seems a lot slower, too, so some of these bosses tin pose a real challenge early on on. And then if you're fix to face off against the bosses in Elden Ring, here'south where to observe them and tips to assist you survive each encounter.
If you desire to avert spoilers in regards to bosses that are part of Elden Ring's progression or endings , be certain to avoid our 'primary' section.
How Elden Ring bosses work
It'due south not only the main bosses you'll need to fence with—open up world bosses are a cool new add-on in Elden Ring. You might be wandering through a lake suddenly to have a dragon land on you lot, Skyrim-mode, or exist crossing a bridge and take to defeat its horseback-mounted guardian. The fights using your Elden Ring mount, Torrent, give combat a whole new dimension, a piddling like Sekiro's speed and jumping turned up to 11.
Yous'll also confront bosses within the dungeons scattered throughout the world. The difference between most dungeon bosses and their main game counterparts feels similar night and twenty-four hour period in terms of wellness and difficulty. A dungeon might require you to fight a few rooms of enemies to go to a dominate, whereas big bads similar Godrick need you to assail a fortress and fight an entire regular army.
When you're non focused on core progression, you'll spend your time building up souls and force through dungeons and open world bosses as a way to get stronger for the challenges the main story throws at you. This guide should help you practise just that.
And if yous just demand to know our own estimate of how hard each boss is, nosotros've given each a 🔥 rating, with 🔥 beingness the easiest, and 🔥🔥🔥 being the hardest.
All the bosses in Elden Ring we've establish and then far
Primary
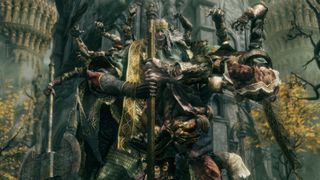
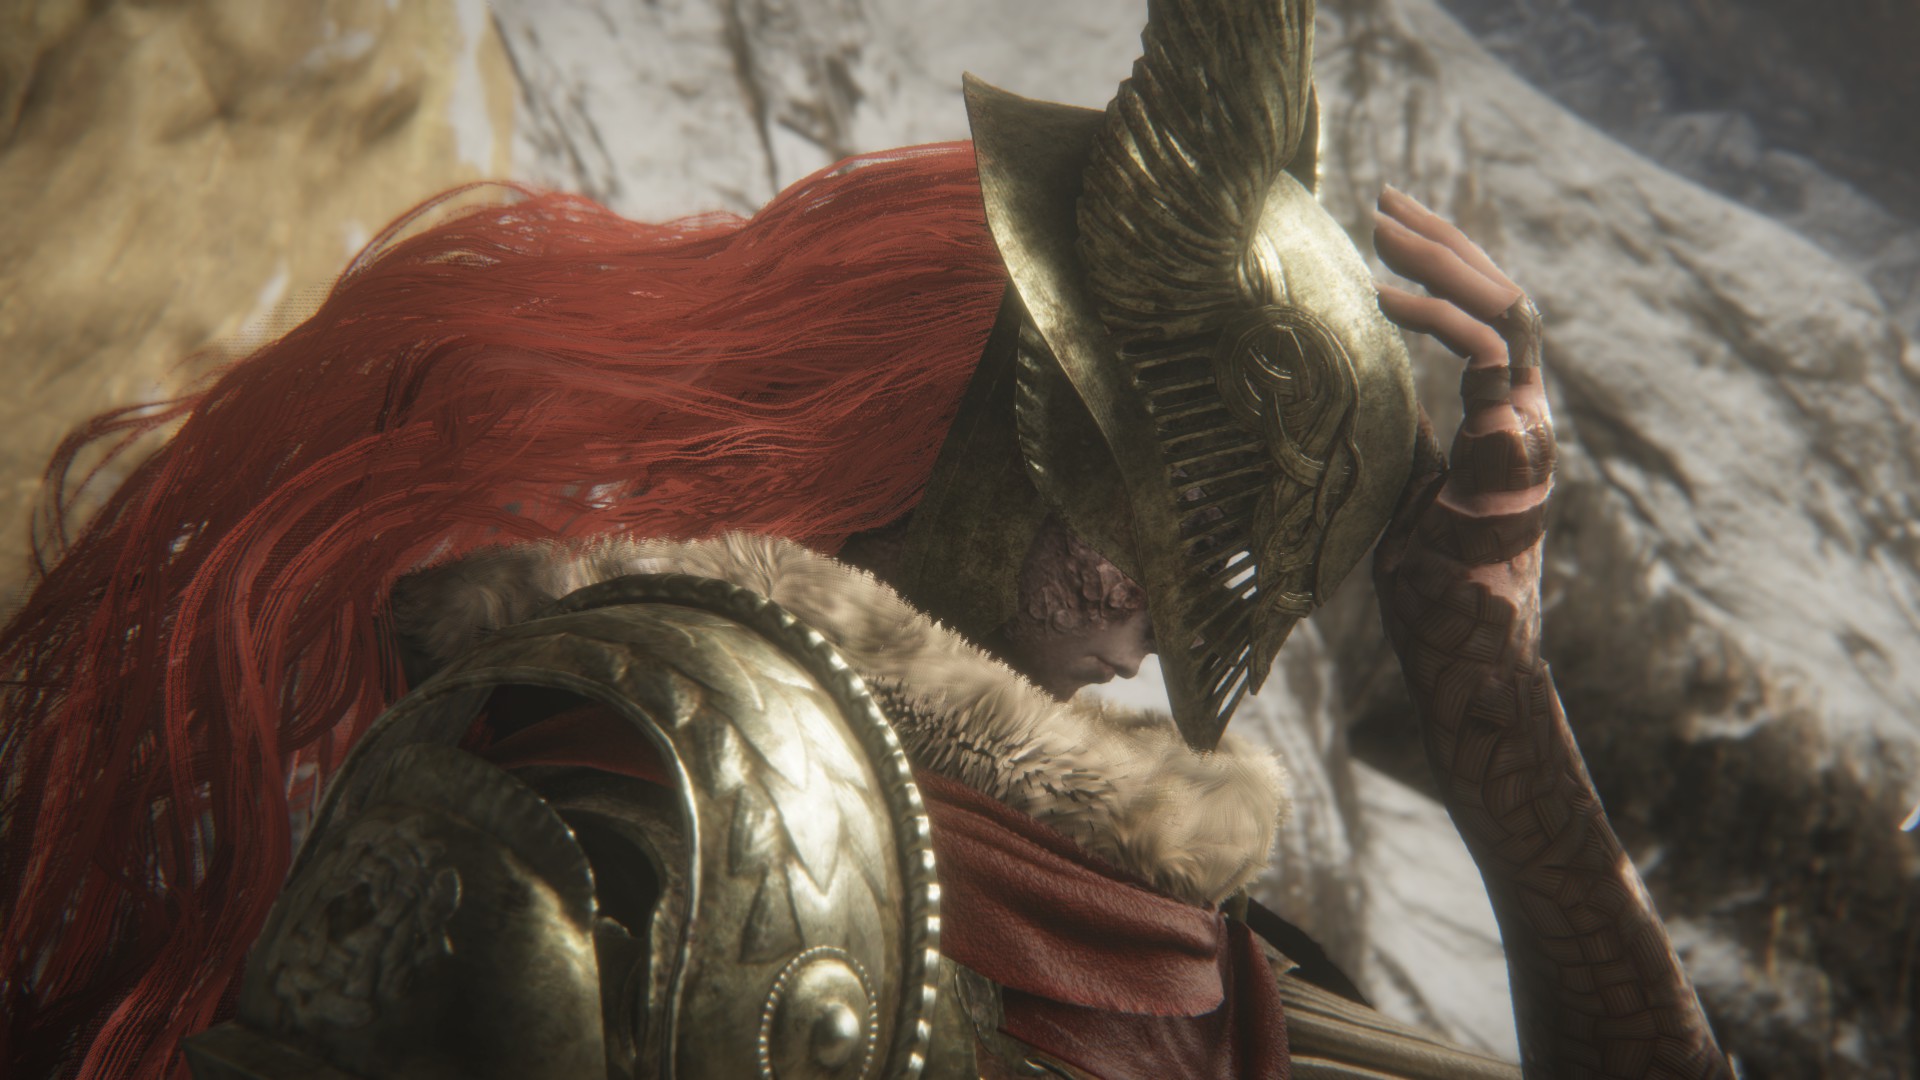
Grafted Scion
Difficulty: 🔥🔥🔥
Reward: 3200 Runes, Ornamental Straight Sword, Gilt Animate being Crest Shield
Location: On the bridge afterward leaving the Chapel of Anticipation
This boss has many arms, long combos, and a scream that hurts you. You aren't expected to win this fight. You will face them later in the game, though, and the best advice is to use ranged attacks, go behind them, or bring a shield. They are very difficult to shell with just dodging due to the sheer frequency and speed of their combos.
Soldier of Godrick
Difficulty: 🔥
Reward: Runes
Location: Stranded Graveyard. Down the hole next to the sitting ghost when you first wake up.
He wields a greatsword simply is basically merely a jumped-up enemy. Use a jumping charged attack to avoid his running stab and stagger him, then perform a counter to take near of his wellness.
Margit, the Fell Omen
Difficulty: 🔥🔥
Reward: Talisman Pouch
Location: After the ballista at the gates to Stormveil Castle.
Items to bring: Margit'due south Shackles (5,000 Runes from Patches)
His variable assail speed is the nearly challenging affair about Margit. The windup to his guild attack, for instance, is very slow, but and then he will suddenly draw a knife of light with his other hand and slash y'all before jumping abroad and throwing information technology at you lot. These throwing knives tin exist particularly annoying if yous're trying to heal later on he has just jumped away.
At around 2-thirds wellness, he'll enter his second stage. His combos will exist longer, and he'll mix in the hammer, throwing knives, and a sword of light. The opportunities for dealing damage are slim since he's and so aggressive, and it's best to stay away from his four attack philharmonic. If you're finding it too hard, y'all can ever summon Wizard Rogier, who'll assist split his aggro a flake.
Godrick the Grafted
Difficulty: 🔥🔥🔥
Reward: Remembrance of the Grafted (boss soul)
Location: Stormveil Castle.
Watch out for his convulsion attack, where he'll strike an axe into the ground twice, dealing harm in an ever-larger AoE. He'll also create a damaging whirlwind AoE that increases in size iii times. When he activates the tertiary, he'll also spin into the air and slam down with his axe. Thankfully, his regular attacks are easy to dodge, and jumping attacks tin can prove effective.
Once you get him downwardly to around one-half health, he'll showtime screaming and chopping at his arm. Have this opportunity to deal every bit much impairment as yous can before he enters his second phase. Correct at the get-go of this stage, dart for his right side to avoid his arc of flame. At present he'll add fire attacks from his new dragon arm, his AoE whirlwind, and he'll add together a third slam to his earthquake. Y'all tin can summon Nefeli for this fight, just only if you talk to her in a room to the right of the courtyard afterward you fight the bladed Stormhawks.
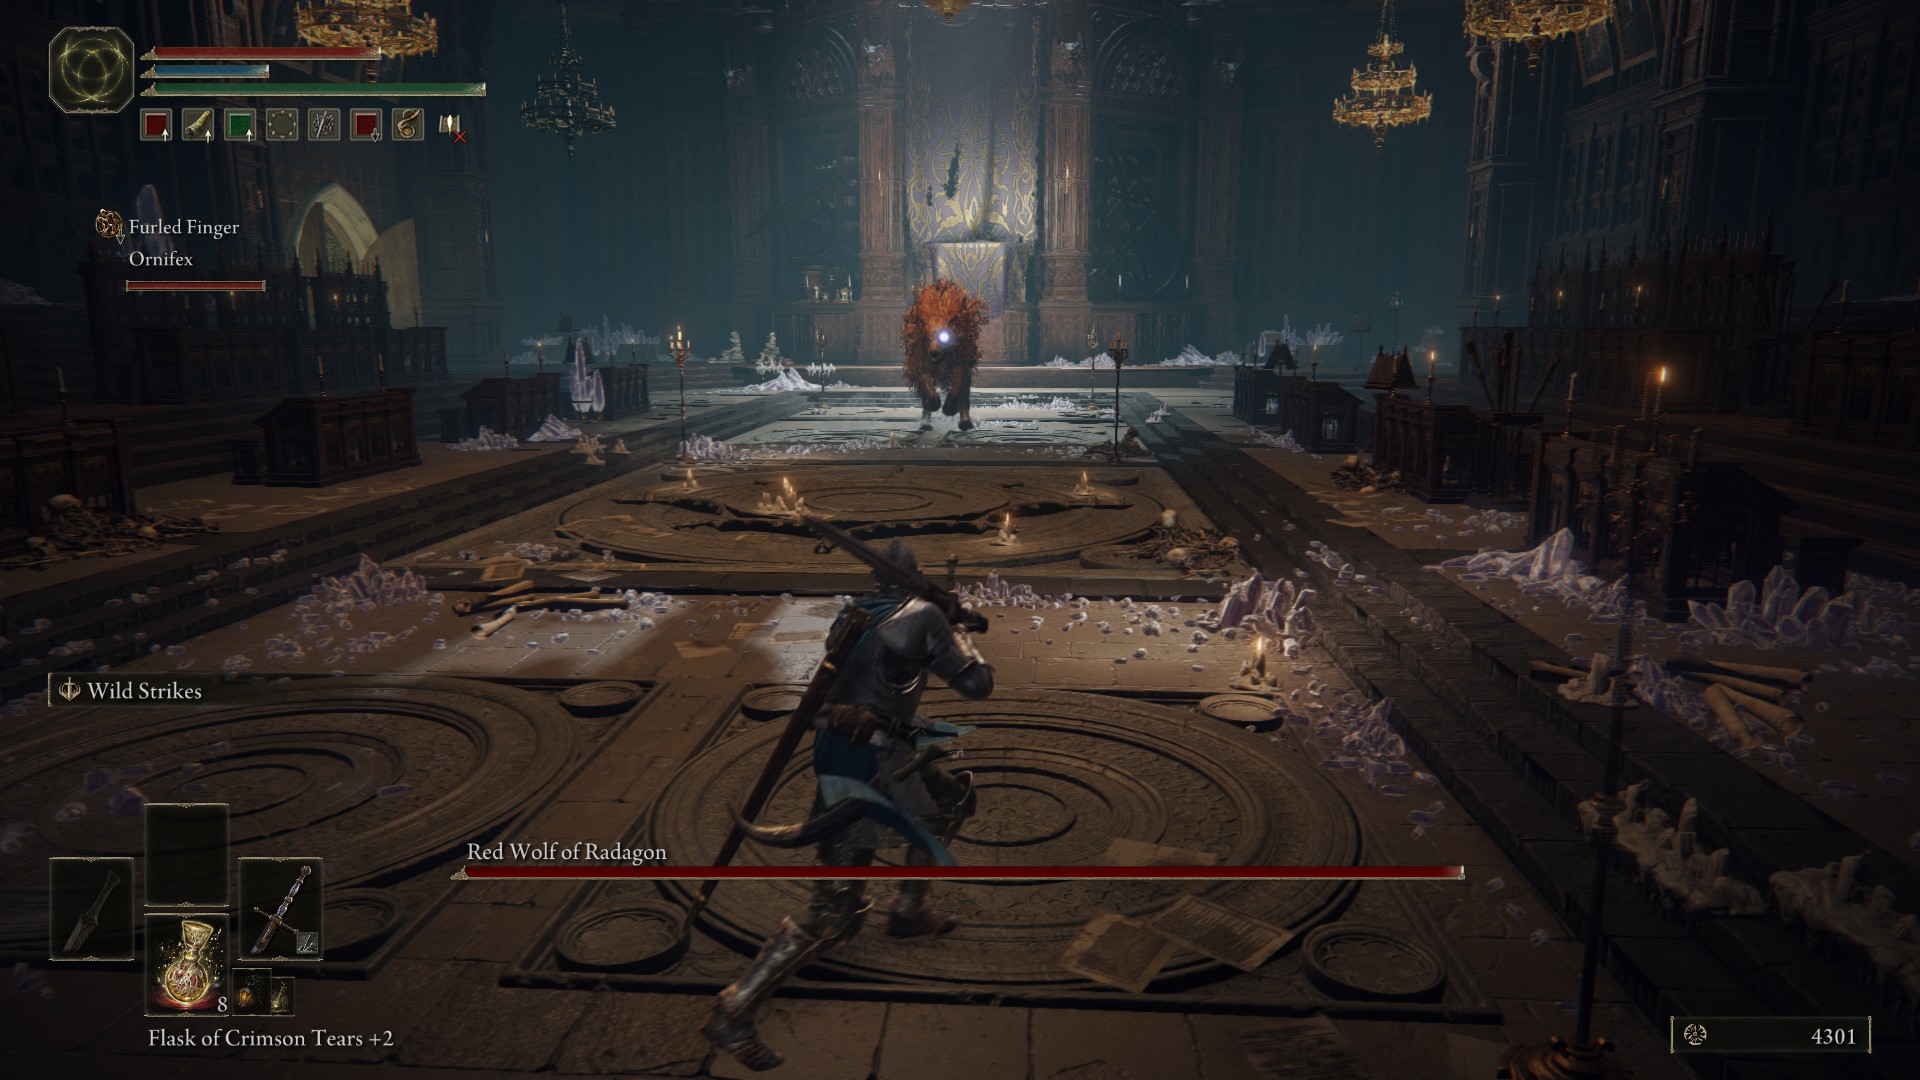
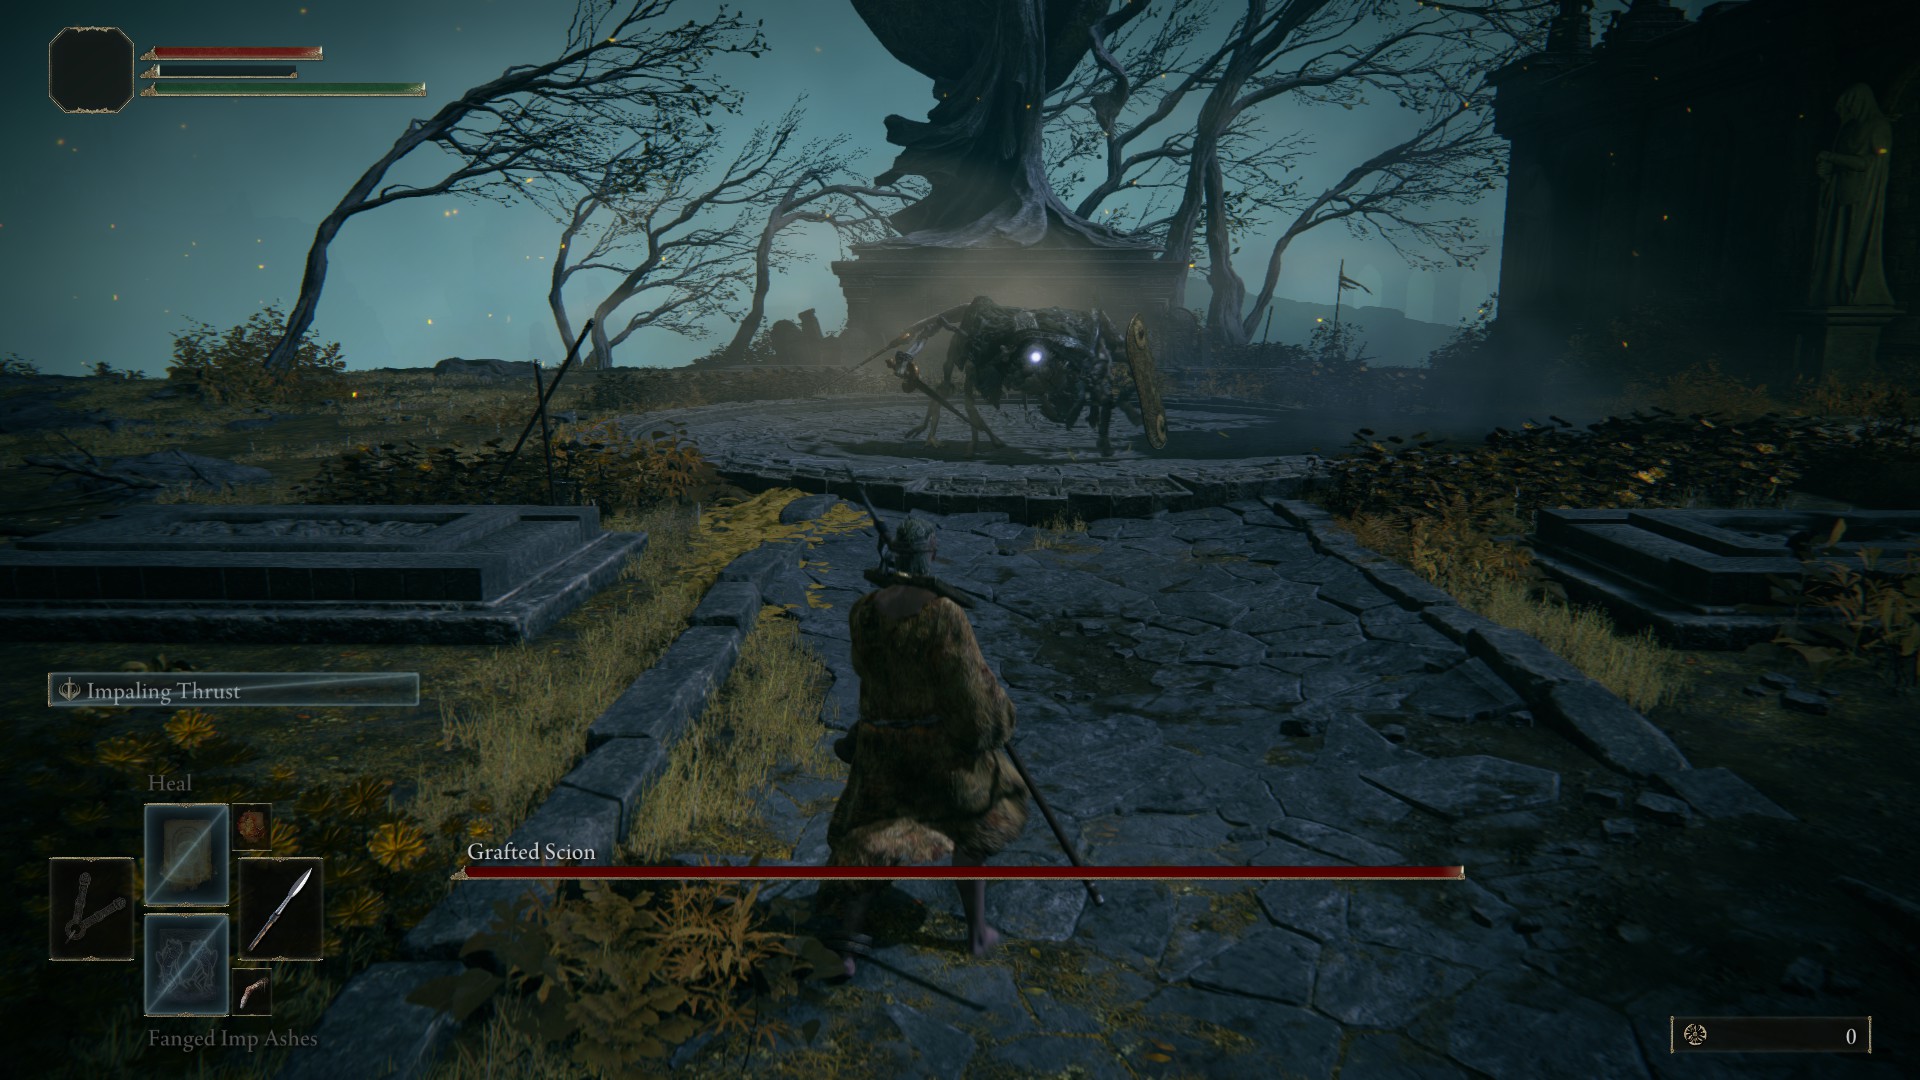
Red Wolf of Radagon
Difficulty: 🔥🔥
Reward: Memory Stone (increases spell memory)
Location: Raya Lucaria Academy
This big cherry doggo is the first boss of the Raya Lucaria Academy, and is extremely aggressive. If you were just fighting a large angry dog, that'd be fine, but this dog likewise has magic. Throughout the fight it will summon blue swords to burn at yous, before jumping in to bite. It likewise creates a crimson blade in its mouth with which it slashes from side-to-side and jumps into the air to slam down on pinnacle of you. If you're a melee person, it'south definitely a proficient idea to use a summon to provide breathing room.
Rennala, Queen of the Full Moon
Difficulty: 🔥🔥🔥
Reward: Remembrance of the Full Moon Queen (dominate soul)
Location: Raya Lucaria University
Items to bring: Bleed weapons, fast weapons (for staggers)
In the first phase, she'll float around the ceiling in a shielded cocoon. To bring her down, hit three child-similar scholars with the glowing aureola, and the cocoon volition intermission. Rennala volition and so fall to the floor, letting you lot deal damage for a prepare amount of time. In one case she starts to glow, back off very quickly to avoid an AoE explosion.
In her 2d phase, Rennala will transport you to a moonlit lake and offset firing sorceries at you, outset with a beam that will one-shot you if you're not careful. Watch out for the crystal shards she summons to rapidly fire at you lot. Thankfully, she staggers pretty easily in this phase, and bleed is especially good against her. If the fight goes on long enough, she'll create an AoE shockwave effectually her and summon unlike enemies, ranging from wolves to a dragon. If you tin summon anything to kite the enemies or assault her, it'll brand the fight a lot easier.
Starscourge Radahn
Difficulty: 🔥🔥🔥
Advantage: Remembrance of the Starscourge (dominate soul)
Location: Redmane Castle, Caelid
Items to bring: Rot great, Rot pot
Radahn is a fun dominate, but tricky due to his size, aggression, AoE attacks, and unpredictable aggro. When you head through the portal into the dominate arena, summon allies using the signs while dodging Radahn'due south ranged attacks, or using the rubble to block them. Stay at a distance until your allies bring Radahn into melee and he draws his swords.
Now, get on horseback. If y'all take toxicant or ranged, I suggest chipping him down while continuing to summon allies with the signs that re-appear once they dice. If yous're melee, sprint in on Torrent to make charged attacks against his rear/horse when he concludes combos. Generally maintain altitude, though, and allow your allies to distract him.
In one case he's one-half health, he'll disappear and return as a flaming comet. While he's away, run around the hill crest and summon more allies. In this phase he'll conjure 4 meteors around him. Continue to summon and chip him down when possible, but stay close to the ridge-crest. When he runs away from yous, he's gonna send those meteors flying, so utilise the loma crest to block them. If yous are melee, this fight takes a piffling while, since it requires some caution in terms of getting hits and not losing Torrent to his seemingly endless attacks. I too don't recommend summoning a friend for this, since it's even harder without a equus caballus.
Godfrey, Commencement Elden Lord
Difficulty: 🔥🔥
Advantage: An extra Talisman slot
Location: Leyndell, Royal Capital
This axe-wielding spirit giant is pretty aggressive, but easily manageable if you lot can separate his aggro between 2 people due to the shape of the loonshit. The attacks to watch out for are his foward charge and stomp, which breaks the footing in front of him in a cone and hurt you if information technology hits. His axe combos are relatively easy to dodge, but he also throws his axe, and jumps into the air to slam it down. If y'all are hit him and taking his aggro, beware that he may suddenly spin and perform his stomp in your direction.
Morgott, the Omen King
Difficulty: 🔥🔥🔥
Advantage: Remembrance of the Omen Rex
Location: Leyndell, Majestic Capital
Morgott is one of the hardest bosses in the game. He'southward extremely quick, deals a lot of damage, and his attacks have very broad arcs. I recommend you summon Melina, and an NPC ashes summon like Oleg for the start phase in order to split his aggro. At first he'll just swipe with his sword, throw knives, utilise his hammer, and summon light swords from above you that split the loonshit into sections. This is the time to get ambitious if you want Melina to live into the second phase, which is extremely helpful. Anytime he turns his back to hurt her, get some hits, then rinse and repeat. Greatshields can too be adept in this first phase due to his purely physical impairment attacks.
Once his health is down to half, he explodes in an AoE and his sword will gain what looks to exist an occult infusion. Go along as before, merely now be aware of his longer combos, and particularly, when his sword turns red and he prepares to assault. If he's pulling his sword back to stab, he's going to rush forward to kill y'all. Otherwise, it's a two-hit assail, but because the first stun locks you, it's likely you'll dice if you're hit by either. The key with Morgott is timed assailment and aggro swapping in order to proceed your summons alive, while being aware of his big attacks. He can impale you very rapidly in 2 hits, only if you time things correct and contrivance accordingly, you lot should have it.
Burn down Giant
Difficulty: 🔥🔥
Advantage: Remembrance of the Burn down Giant
Location: East Mountaintops of Giants
You'll want to be on Torrent for the entirety of this fight. The Fire Giant is massive and his attacks comprehend a wide surface area, simply they don't often hit the same spot he'south in. That means that your goal for this fight is to stay underneath him and attack his left foot. Keep attacking that foot until he either staggers or does an AoE. Occasionally he'll tuck a fire orb into the ground and it'll try to follow you, so keep moving when you run into him reach down.
In the second phase, the behemothic is immobile, but your goal is the aforementioned. Stay right underneath him until he does a wide burn attack. The biggest mistake you tin make is to be on his side, because he volition roll over and it'll likely kill you.
Maliketh, the Blackness Blade
Difficulty: 🔥🔥🔥
Reward: Remembrance of the Blackness Blade
Location: Farum Azula
Items to bring: Bleed damage, Mimic Tear Ashes
For the first phase, you want to carefully find opportunities to get close to the Animal Clergyman. He'll oft use ground attacks that cover the area around him. The fight is all well-nigh using a summon or your Spirit Ashes to take aggro and to get hits in when you tin. Information technology's adequately simple.
When his name swaps over to Maliketh, you've got more to deal with. The trick with Maliketh is that his attacks leave a DoT on you when they country. Yous'll probably want to keep yourself at full wellness for most of this fight. Melee fighters can stay nigh him for big sweeping attacks, but magic users will need to keep careful distance and use the statues for space.
Hoarah Loux, Warrior
Difficulty: 🔥🔥🔥
Advantage: Remembrance of Hoarah Loux
Location: Farum Azula
Items to bring: Drain damage
This dominate is very similar to the illusion version of Godfrey that we accept explained below. It's the same guy! He has more health so yous need to avoid axe swings for a piffling longer and minimizing damage taken before the second phase begins. Bleed damage is good here too.
The second phase is a scrap tougher. He has fast ground- and fire-based AoEs and melee-ranged attacks that will decimate you if you lot don't have the stamina to spend on a few dodges. Make use of the arena and keep your space from him, or employ something similar the Mimic Tear Ashes to distract him. Like a lot of the tardily-game fights, it'south all about patience and waiting for him to exercise attacks that leave him in a long animation.
Malenia, Blade of Miquella
Difficulty: 🔥🔥🔥🔥
Reward: Remembrance of the Rot Goddess
Location: Elphael, Caryatid of the Haligtree
Items to bring: Bleed, Frost, Magic, and peradventure a greatshield
I know our scale only goes up to 3, but Malenia is arguably the toughest boss ever featured in a FromSoftware game. We go into more depth in our dedicated guide, but safe to say, her strength is due to two primary factors: she heals herself when she hits you, fifty-fifty if hit a shield, and she has one assault that can be virtually impossible to bargain with depending on whether you have high endurance and a greatshield, or where you lot're continuing.
The best bet for beating her is either trading aggro between you with magic, letting you maintain a distance, or ganging upwards on her with two other summons and stunlocking her into oblivion. Bleed and Frost are very good, as is annihilation that knocks her off her anxiety, such as some strength weapon skills, and magic like Comet Azur. Too make certain to bring an incantation or consumable to remove Carmine Rot for the second phase.
Radagon of the Golden Club
Difficulty: 🔥🔥🔥
Reward: Elden Remembrance
Location: Leyndell, Upper-case letter of Ash
Items to bring: Resistance to Holy harm, possibly a light equip load
The final boss of Elden Ring is basically two fights stacked on top of each other. The kickoff, Radagon, is a divine blacksmith with powerful AoE attacks that deal Holy harm. He as well has deceptive speed, zooming towards y'all to swing his hammer, and teleporting effectually the battlefield to create explosions. I greatly recommend bringing Holyproof Dried Liver, or the Lord's Divine Fortification incantation, equally this reduces a expert deal of Radagon'south damage potential.
A strong summon is recommended, such as the +10 Mimic Tear, since splitting aggro makes it safer to set on him. A lot of his AoE attacks, like the hammer strikes and lightning bolts, require precise dodging, and so a low-cal equip load can brand things easier, and the reduction in resistance doesn't affair so much if you're using some kind of Holy harm reduction.
One time Radagon dies, you'll have to confront the Elden Animate being. This part of the fight is arguably a lot simpler than Radagon, since the animal's sword swings, exploding clouds, and the arcs of the lite it fires are well telegraphed, and easier to dodge. I institute the best style to deal melee damage was to go far close around its middle, since information technology doesn't take much to protect against this other than the occasional fire assail or to reposition.
The other attacks to be aware of are when it flies into air to summon a ring around you that can exist jumped before dodging the following explosion. Likewise exist aware of it summoning Holy missiles like to the Erdtree Avatars. Simply sprint to ane side when you see it summoning and the missiles volition fall behind you.
Open earth
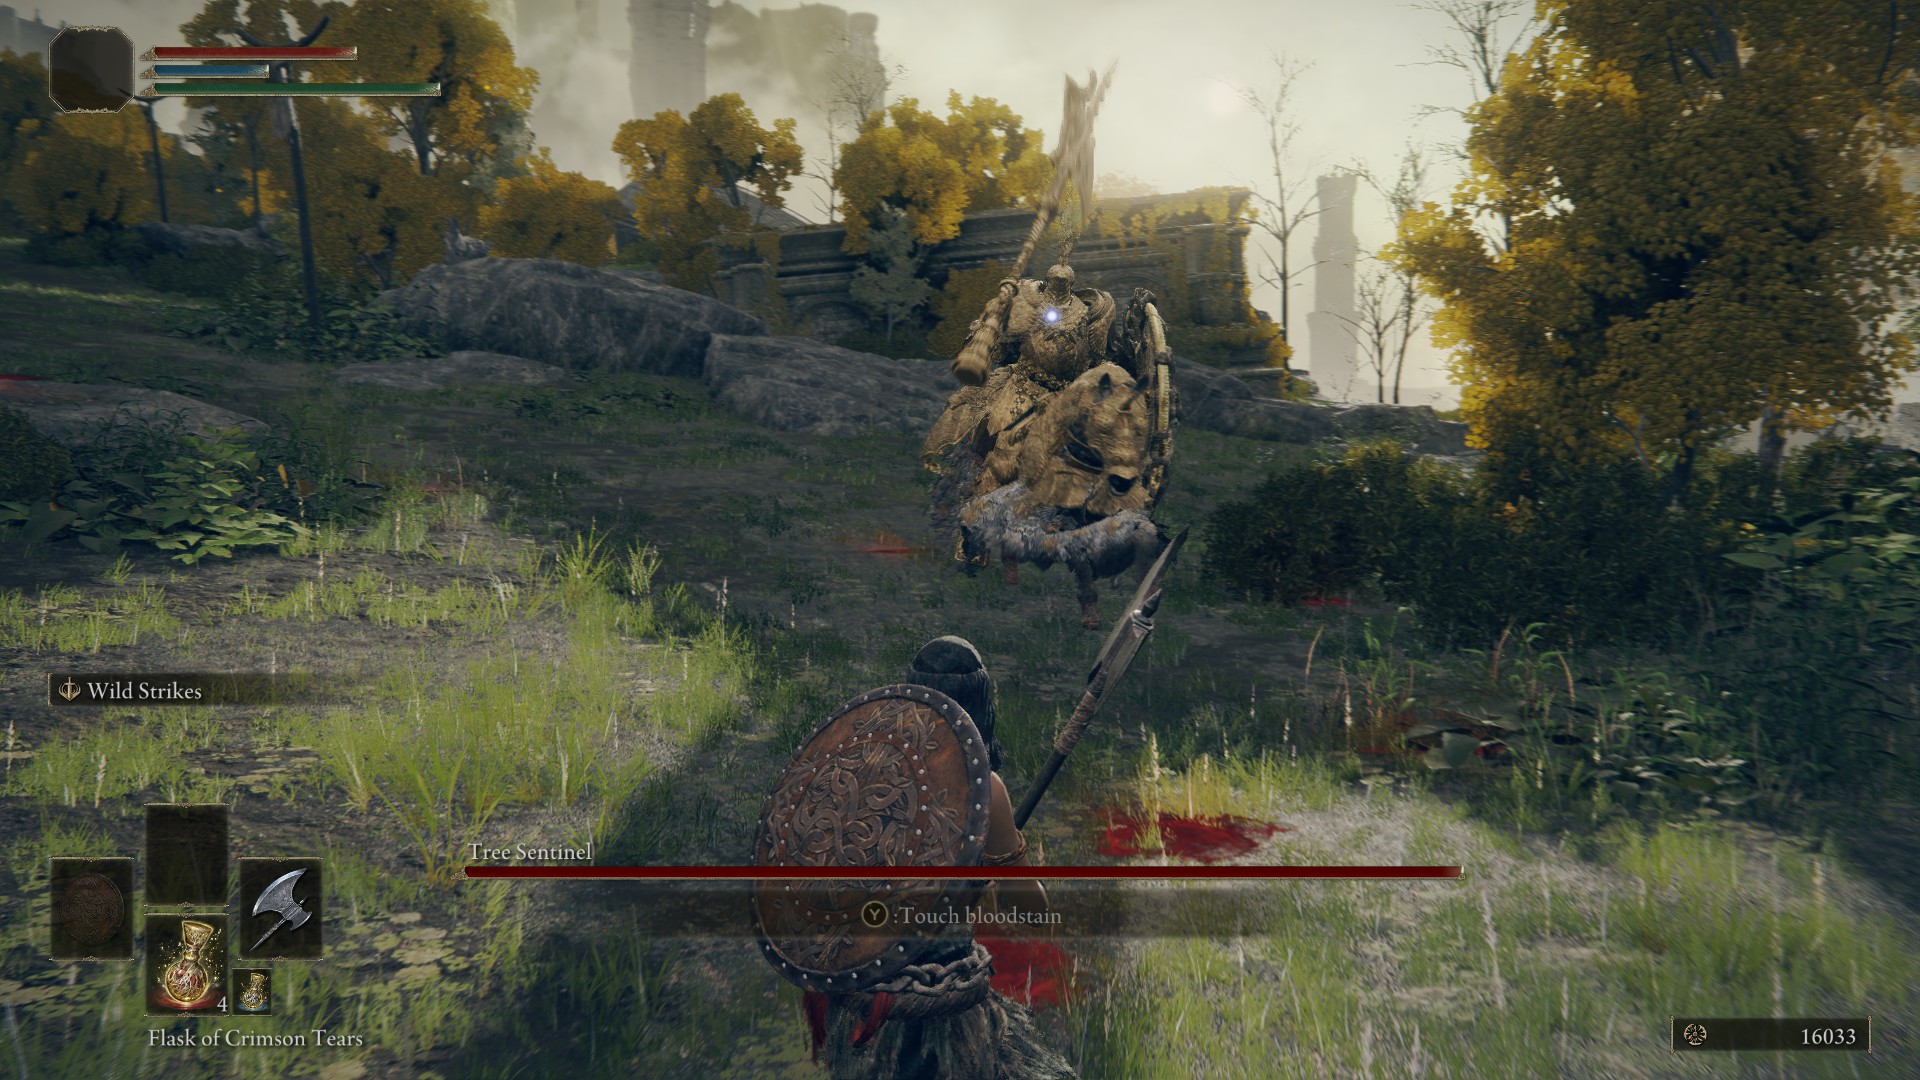
Tree Sentinel
Difficulty: 🔥🔥
Reward: Golden Halberd
Location: West Limgrave. Stranded Graveyard leave
The Tree Lookout is much easier one time you accept Torrent, and it makes for your first real horseback challenge. Keep your altitude when he's swinging his halberd, then run past on your equus caballus to get a couple of hits in on his rear or shielded side. He is dangerous when upwards close, but provided yous proceed evading and making passes, you lot'll triumph. Information technology as well doesn't hurt to bring some Rowa Raisins to heal Torrent.
Full-Grown Fallingstar Fauna
Difficulty: 🔥🔥
Reward: Fallingstar Creature Jaw
Location: Mt. Gelmir. Ninth Mt. Gelmir Campsite.
Torrent helps a lot with this boss simply because it moves semi-erratically and needs to be hit on its back or on its head. Become fix for a long fight where you need to capitalize on the moments where the beast misses its close-range attacks. Watch out for its electric spikes that information technology summons with its pincers; y'all can run abroad in a straight line to avoid it.
Flight Dragon Agheel
Difficulty: 🔥🔥
Reward: Dragon Center
Location: West Limgrave. The lake east of Stranded Graveyard.
This dragon is tough to fight if you don't have Torrent, just otherwise, information technology's relatively easy to deal damage while also evading its AoE fire-breathing. Ane assail to lookout out for is when Agheel flies into the sky and hovers, significant he's about to swoop down on top of you, though it'due south easy to avert if you're moving away from the dragon and aren't close by. In one case he slams down, be sure to smack him in the caput for a little extra harm. Also, beware of his tail spin if you attack him from backside. As ever, bring some Rowa Raisins for Torrent'south wellness.
Night Cavalry
Difficulty: 🔥🔥
Reward: Ash of War: Repeating Thrust
Location: Due east Limgrave. At nighttime, on the road southward of the Agheel Lake Northward site of grace.
This mounted boss is pretty aggressive, but you can beat him by staying at a distance and dealing impairment when you can. The attacks to watch out for are his jumping downward slash, which tin can be dodged to either side before getting some hits in, or his horse's quick side barge when you're upward close. Generally, it'southward best to hitting his horse from the rear. Chances are information technology'll dice before he does, but if yous give him space, he'll summon it again, and so keep the pressure on.
Bloodhound Knight Darriwil
Difficulty: 🔥🔥
Reward: Bloodhound's Fang greatsword
Location: Forlorn Hound's Evergaol, southernmost point of Due west Limgrave
Quick tips: This Artorias-esque bestial swordsmen doesn't accept too much health, merely he is super aggressive. Since he combos for days, it'due south best to stay at a distance and get hits in when they stop. Expect out for when he scrapes his claws along the footing to uppercut you, followed up by a quick overhead slash. He also has a leap attack with pretty deceptive range, then it's best to stay well dorsum. Keep getting those hits in betwixt his combos and he'll exist dead before yous know it.
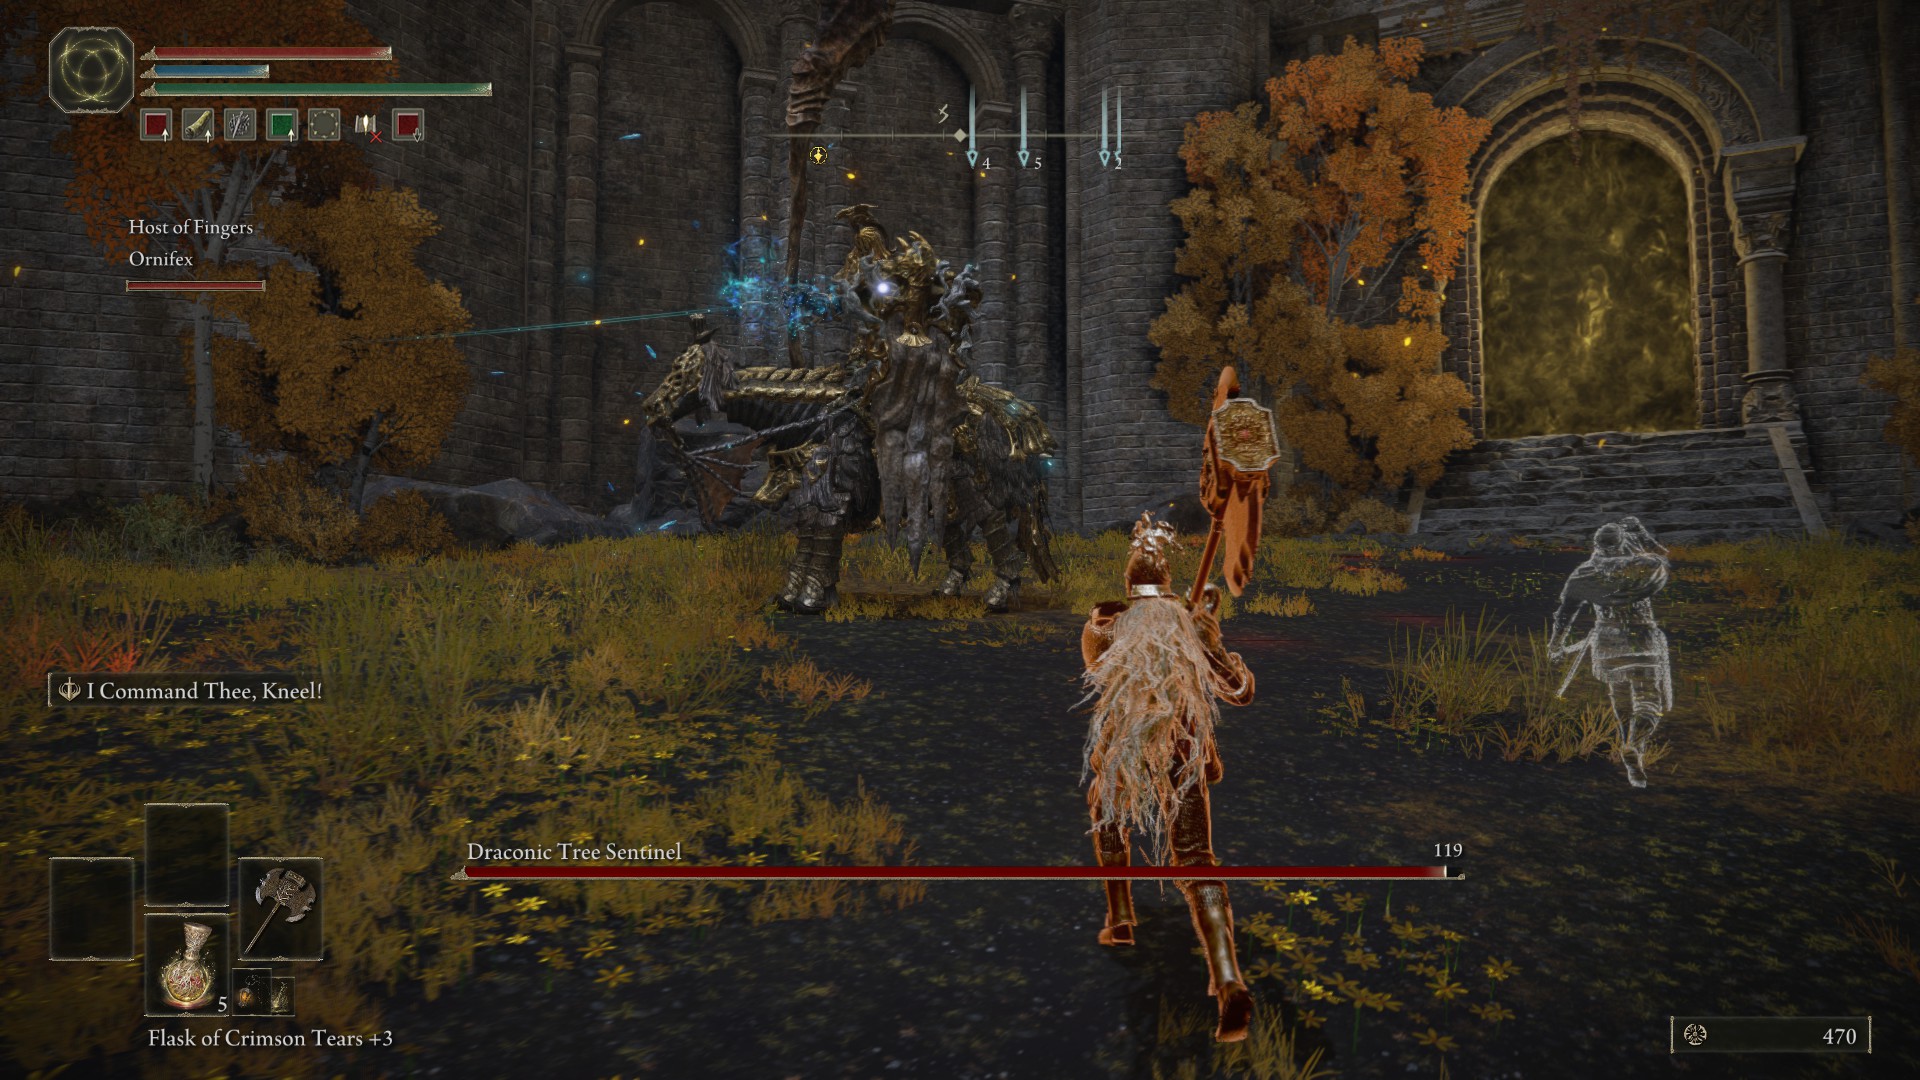
Draconic Tree Sentinel
Difficulty: 🔥🔥🔥
Advantage: Dragon Greatclaw hammer, Dragon Claw shield
Location: Blocking the back gate into Leyndell
The mounted boss to end all mounted bosses. This guy is tough due his powerful AoE attacks and the lightning he calls downwards from the sky in his 2nd phase. I recommend summoning a friend and fighting him on foot to split his aggression. In terms of attacks, lookout out for his horse spitting flames at you, and in the second phase, when he calls down lightning from the sky. The key to dodging this is rolling just as he dips his shield. If you lot insist on fighting horseback, deal damage on his shield side, since he can't go at yous with his hammer, and jump to avoid his AoEs. When he runs at yous, he's going to jump and slam his hammer down.
Crucible Knight
Difficulty: 🔥🔥
Reward: Aspects of the Crucible: Tail incantation
Location: West Limgrave. Stormhill Evergaol.
This knight is located in the Stormhill Evergaol on the loma, directly to the southwest of the Gatefront site of grace in Westward Limgrave. His kickoff stage is relatively easy since he has quite stilted movements, but once you knock him by half health, he sprouts wings and a tail. The attacks to be enlightened of are his sword lunge, which has deceptive range, and when he flies into the air, every bit he's nearly to charge you. When he whips his tail out, he too follows up with a tail spin that has massive range, so go gear up to contrivance.
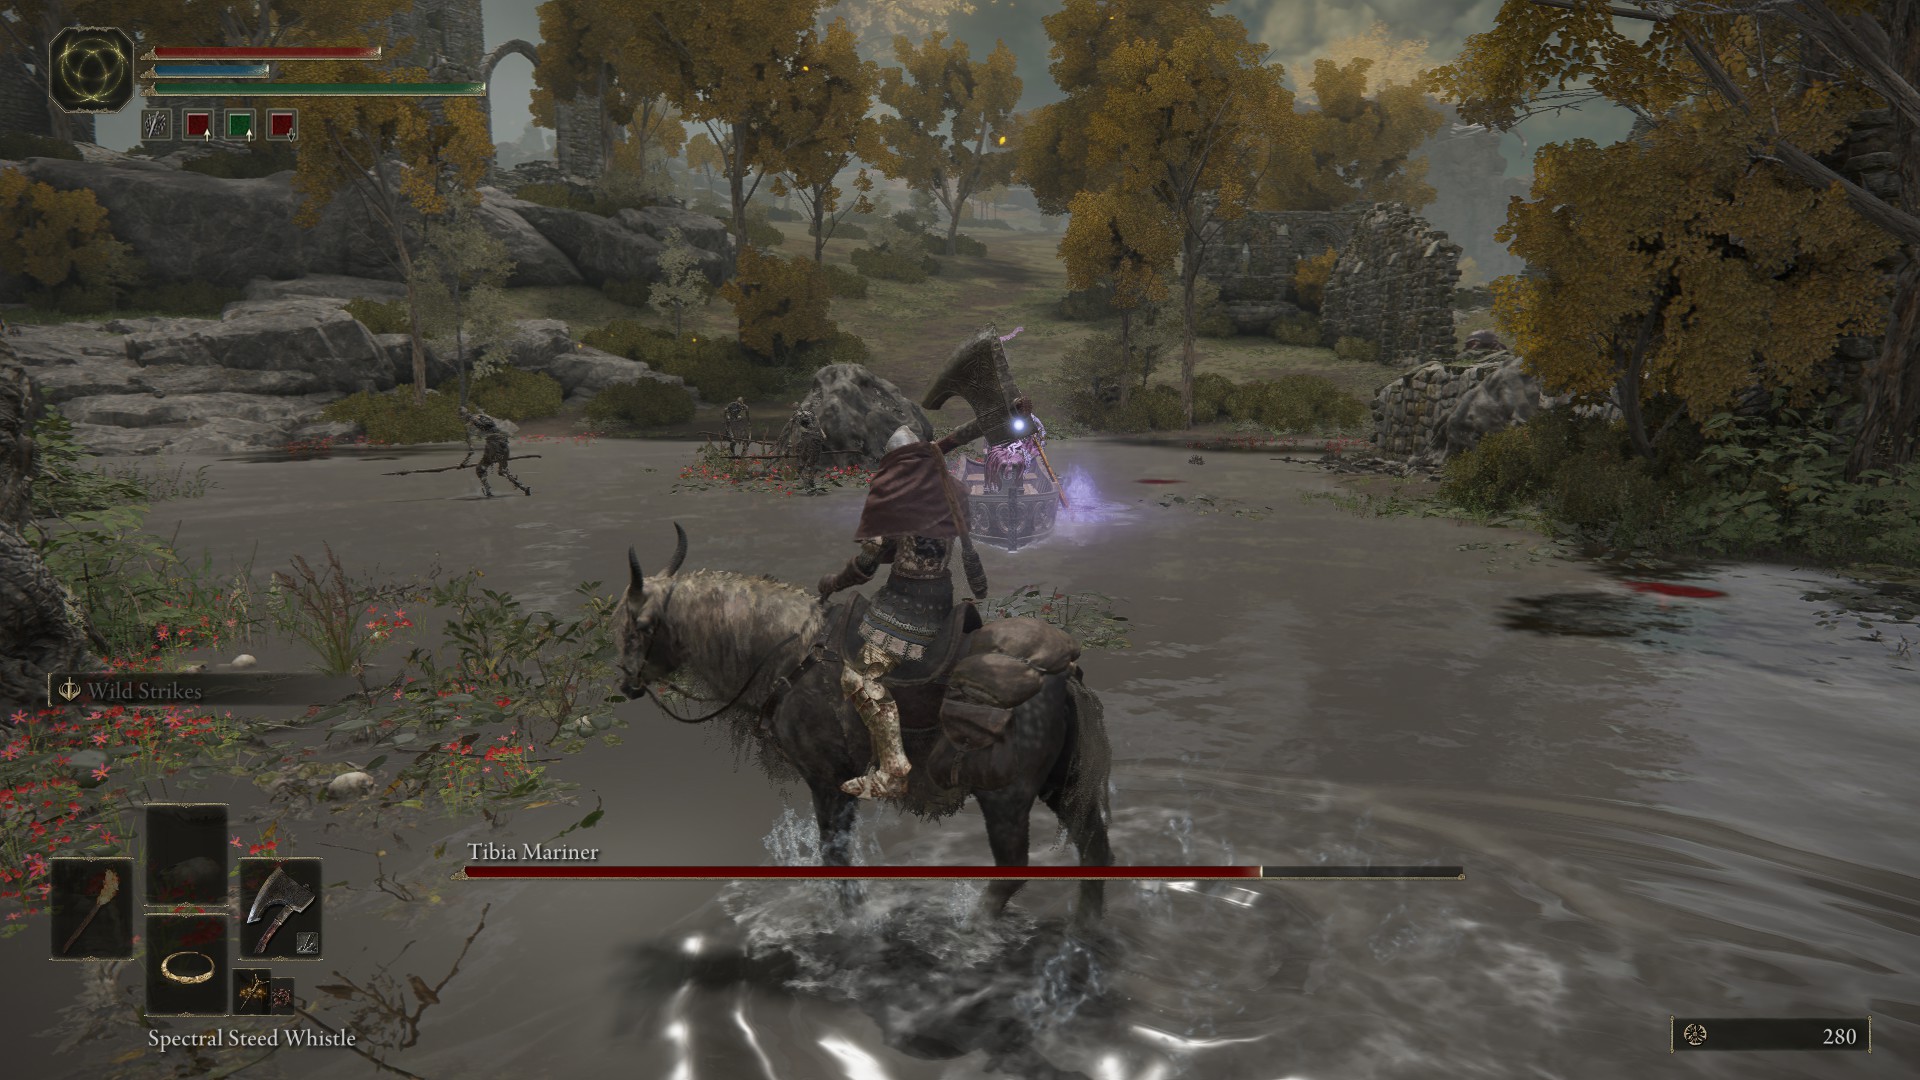
Tibia Mariner
Difficulty: 🔥
Reward: Skeletal Militiaman Ashes, Deathroot (Summonwater Village), Tibia Summons sorcery (Wyndham Ruins)
Location: Multiple locations
Quick tips: These undead boatmen plough upward throughout the Lands Between, and are harder with each run across, but the easiest is in Summonwater Hamlet, and can exist beaten with Torrent. He just has three attacks: holding his staff upwardly in the air for a very boring AoE shockwave, tilting his boat to splash down and damage you with water, or throwing water at you using his staff. Considering of your speed, you tin can outmanoeuvre the skeletons he summons, just be wary of the i with the scythe at the back of the hamlet who summons skulls that home in on you. At that place's no real blitz with this boss, so but take your time and flake the boatman down.
Glintstone Dragon Smarag
Difficulty: 🔥🔥🔥
Advantage: Dragon Heart
Location: Well-nigh a rocky outcrop to the westward of Raya Lucaria University
Quick tips: This magic dragon guards the Glintstone Fundamental required to suspension the seal on the academy door, but you don't have to kill him to get it. If yous'd adopt to fight him, he has much the same moveset equally Flying Dragon Agheel, except he tin can also fire spells from his mouth, and has a nasty movement where he spins effectually to bite you when near his tail. Look out for his assault when he hovers earlier dropping on you, and for him suddenly jumping into the air to rain fire down. The toughest part of this fight is that he's pretty tanky and his blue burn can 1-shot you, but every bit with any dragon, at that place'south a lot to hitting.
Dragonkin Soldier
Difficulty: 🔥
Advantage: Dragon Halberd
Location: Siofra River, through the portal in the cleaved tower by the Worshippers' Woods site of grace.
Quick tips: This crawling giant clad in armour is definitely one to fight on horseback. His main reaching assail has massive range, and then y'all'll want to maintain distance while circling around him to bait it, then get distance when he reaches for you. Spin back and deal some blows, but exist careful of when he pulls back his hand as information technology deals damage. Rinse and repeat.
Black Blade Kindred
Difficulty: 🔥🔥🔥
Reward: Gargoyle'southward Black Axe, Gargoyle's Black Blades
Location: Dragonbarrow, Caelid. Right outside the Bestial Sanctum.
This guy loves to obliterate dauntless new players that stumble on this part of the map. His fight is really still pretty hard for seasoned Elden Ring players. This fight is all about patience, equally this boss will punish yous for being greedy. Black Blade Kindred rarely has openings to get a hit in while he'south using the sword, so you're essentially waiting for him to pull out the axe. Once the axe is out, you can watch his telegraphed attacks and move in for a few hits. The biggest tip we take for him is to fight him on a hill because information technology makes avoiding his spin attacks much easier to contrivance.
Commander Niall
Difficulty: 🔥🔥🔥
Reward: Veteran'southward Prosthesis
Location: Castle Sol, Mountaintops of the Giants.
Niall is a tough one. He summons ii guards that volition hound you for most of the fight so a Spirit Ash summon is almost necessary here. Y'all want to take out the guards early on. Once ane guard is down you should focus your attending onto Niall. He has a lot of extended attacks with his flag pole, so you want to make sure y'all tin dodge left and right of them. Like almost bosses, simply wait for an attack to get out and get a hit in.
The second stage Niall likes to start spinning his weapon which can be a pain. Give him space and wait for it to end. You want to conserve stamina in this fight then that you have time to dodge all of his fast-paced attacks. He has a lot of lightning- and frost-based attacks that come up out super quick. Y'all need to exist patience and wait for any tiny opening yous tin can get considering if you're not careful he tin can philharmonic y'all to decease easily.
Astel, Natural Born of the Void
Difficulty: 🔥🔥🔥
Reward: Remembrance of the Naturalborn
Location: Ainsel River, Lake of Rot. Get cozy in a bury and accept a ride to meet a big bug.
This dominate makes it feel like you're playing Bloodborne. Astel is obviously magic based, and so be ready for a lot of AoE attacks and beams. Melee players should dodge through Astel's long range attacks to close distance on information technology so attack while you're shut. Ranged players should still proceed close but will need to wait until just subsequently Astel casts to get a few hits in. Generally, you want to buy time with Spirit Ashes like the Mimic summon or another player to find room to impairment this dominate. Holy harm and scarlet rot are also very powerful against Astel.
Dragonlord Placidusax
Difficulty: 🔥🔥🔥
Reward: Remembrance of the Dragonlord
Location: Farum Azula. Jump downward before Maliketh, the Black Blade and lie down to observe it.
This is one of the toughest fights in the game. Placidusax has wide attacks that basically require you to be right adjacent to him to get any damage in. You also have to sentry out for lightning strikes throughout the arena. Then, in the 2nd stage, he will teleport around and exercise a swipe attack that volition probably instantly kill you lot, so exist prepare with a contrivance curl. Bleed harm is pretty adept against him.
Dungeon
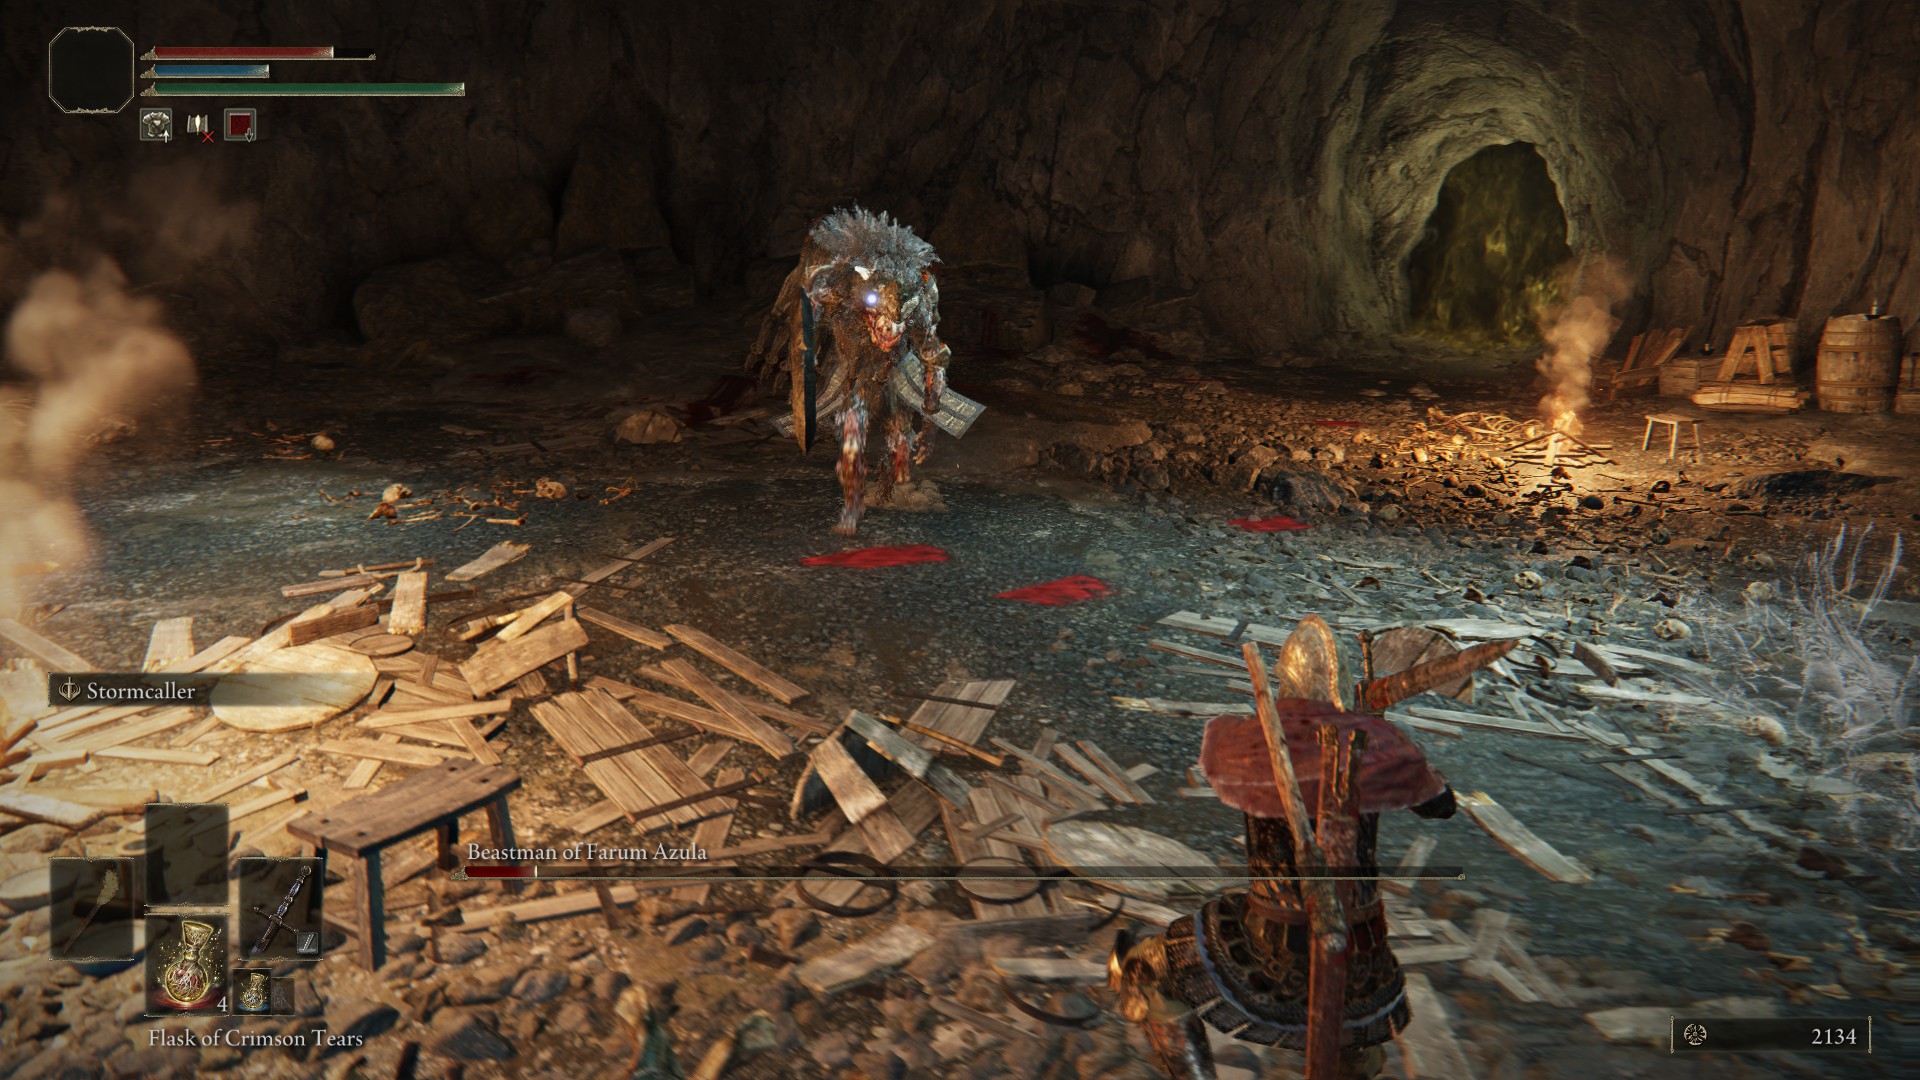
Beastman of Farum Azula
Difficulty: 🔥
Reward: Flamedrake Talisman
Location: Groveside Cavern, West Limgrave
Quick tips: This dominate is pretty piece of cake to beat, helped by the fact that he doesn't have a lot of health. Contrivance and block earlier staggering him with your attacks. He should go downward apace.
Demi-Human Chiefs
Difficulty: 🔥
Reward: Sewing Needle and Tailoring Tools. Beating this boss also allows you lot to admission the island s of Limgrave.
Location: Littoral Cave, Due west Limgrave.
These two bestial chieftains are ameliorate fought individually. Stay about the fire until you've taken out one of them. They are extremely aggressive, so it'southward worth summoning Old Knight Istvan at the entrance to give you some breathing room. Also beware of the other enemies in the arena, and impale them off quickly every bit soon as the fight begins to avoid getting overwhelmed.
Stonedigger Troll
Difficulty: 🔥
Reward: Roar Medallion
Location: Limgrave Tunnels, W Limgrave
Quick tips: This boss is basically the same as the trolls you'll face out in the world, except his weapon combos aren't quite as dangerous. Stick close to his legs, move betwixt his dorsum and his front if he'due south nigh to practice a down boom, and y'all should have him out easily.
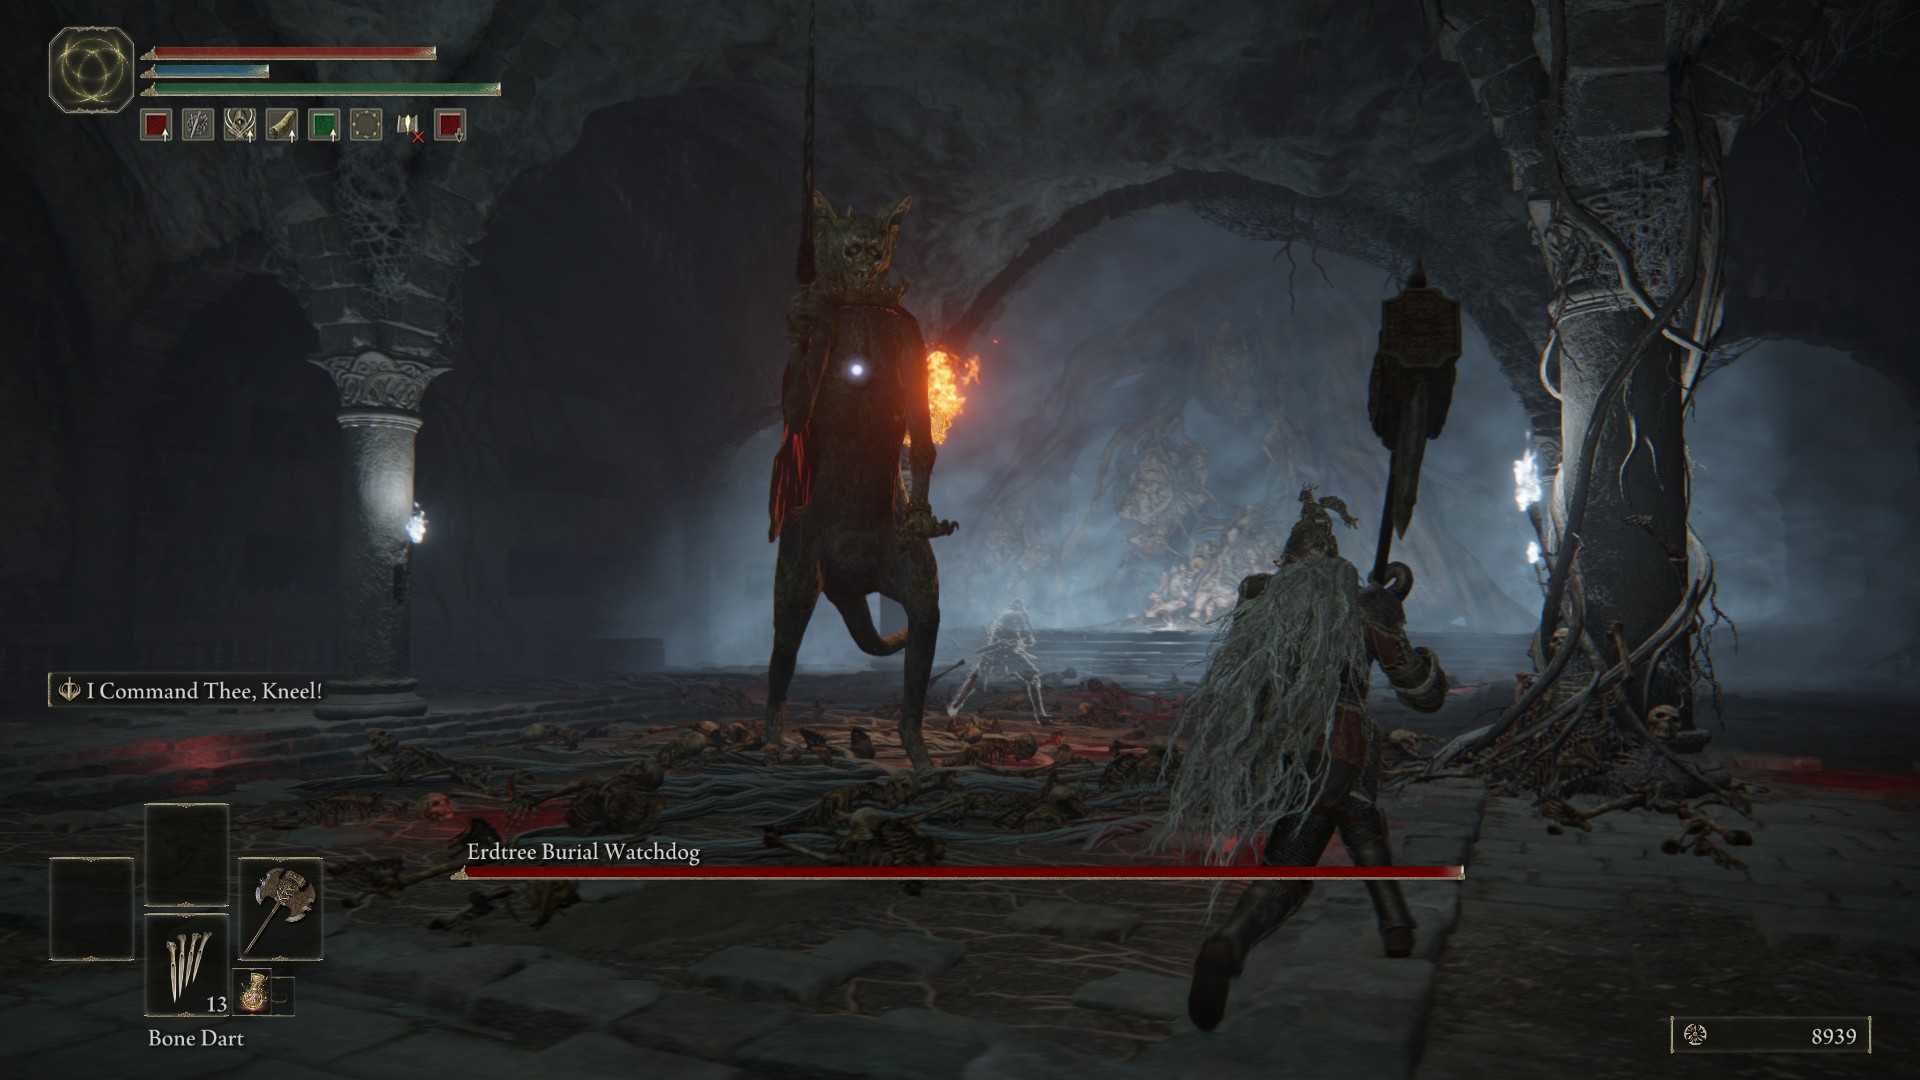
Erdtree Burial Watchdog
Difficulty: 🔥
Reward: Noble Sorcerer Ashes
Location: Stormfoot Catacombs, W Limgrave.
This boss is found in the dungeon, northwest of the Church of Elleh. It isn't and so much difficult as it is pure nightmare fuel. It honestly looks as if someone glued a knife to the paw of ane of those waving cat dolls. It's easy to beat, just watch out for its weirdly timed hovering attack where information technology rises into the air and then slams down.
Blackness Knife Assassin
Difficulty: 🔥
Reward: Assassinator's Cherry Dagger talisman, Deathroot in the chest behind him.
Location: Deathtouched Catacombs, West Limgrave.
This boss is found in the catacombs dungeon to the east of the Warmaster's Shack on Stormhill, set into the cliff. He's pretty easy, particularly if you summon a mob to help yous, only if y'all demand an extra advantage, use a weapon that deals holy damage.
Patches
Difficulty: 🔥
Reward: Cloth Garb and Cloth Trousers
Location: Murkwater Cave, West Limgrave.
Loveable Patches activates when you open a chest in his boss room and will try to rob you lot. He'due south easy to beat and will surrender when he falls beneath one-half health, allowing you to talk to him. Just try to avoid when his shield is upwardly, and he's stabbing at you with his spear.
Grave Warden Duelist
Difficulty: 🔥🔥
Reward: Boxing Hammer
Location: Murkwater Catacombs, W Limgrave.
It's better to be close to this dual hammer-wielding gladiator since a lot of his attacks just don't seem to connect if yous're right up in his face. This also lets y'all avert his sweeping chain attacks. Once y'all get his HP down to around half, he'll roar and enter his more aggressive second phase. You tin still stay close-ish to him but beware of his grab attack, where he throws you, rather rudely, across the room.
Mad Pumpkin Head
Difficulty: 🔥🔥
Reward: Gain access to Selen and her sorceries
Location: Waypoint Ruins, East Limgrave
This metal-headed giant wields a flail that causes blood loss buildup and will suddenly smash his head into the ground to crush you. He's pretty aggressive, and yous fight him in a small-scale room, so it'south better to stay relatively shut, circling around his sides and back while fugitive his sweeping flail attacks. He doesn't have likewise much health, but try to use sideways slashes to avert hitting his armoured head.
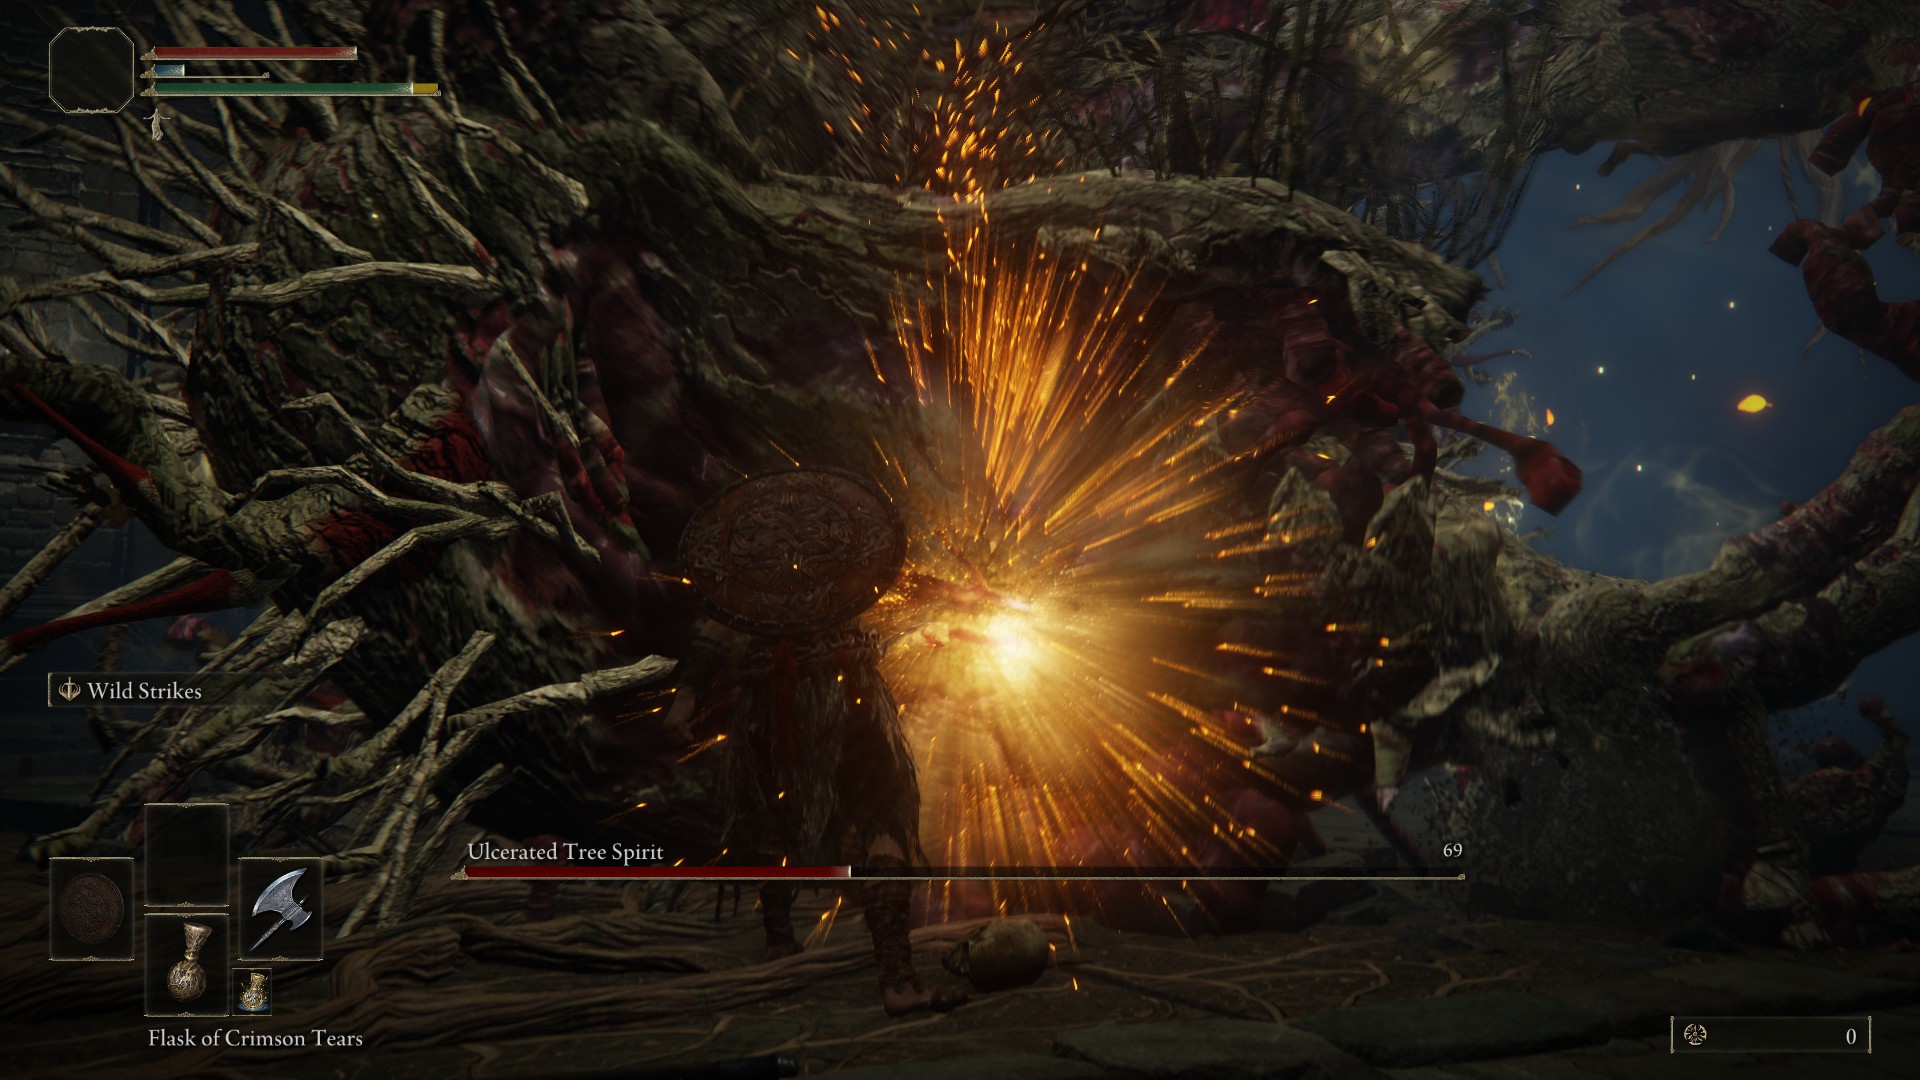
Ulcerated Tree Spirit
Difficulty: 🔥🔥🔥
Reward: Gilt Seed and Banished Knight Oleg (Fringefolk Hero'southward Grave), Leaden Hardtear and Cerulean Hidden Tear (Mt. Gelmir)
Location: Fringefolk Hero's Grave, Due west Limgrave (also Mt. Gelmir)
Quick tips: The best way to beat this boss initially, is to stick to its side and deal impairment when you tin can. Just be aware of its downwardly paw smashes. Scout out for this dominate's tail attacks, and make certain you dodge into them far plenty back that yous don't go carried forth with the tail.
When it roars and rears into the air, get set to dodge considering that grab attack volition deal a lot of impairment. It'll oft conclude this philharmonic by breathing fire, and that'south your best time to get hits in. If you harm it plenty, information technology falls to the ground, letting you deal a counter to its glowing eye. At around half health, it will glow before performing an AoE explosion that as well makes pillars of light come out of the floor, so untarget and run for your life.
Ruin Golem
Difficulty: 🔥🔥
Advantage: Blueish Dance Charm
Location: Highroad Cave, West Limgrave
This is pretty piece of cake to trounce if yous stick effectually his ankles while staying aware of his stomps. He also likes to slam the finish of his weapon into the floor. He'll occasionally kneel downwardly to spew fire, simply it'due south very easy to spot and get a little distance. Similar Tower Knight in Demon Souls, slash his ankles plenty, and he will topple, letting you perform a strike on his chest.
Ancestor Spirit
Difficulty: 🔥
Reward: Bequeathed Follower ashes
Location: Hallowhorn Grounds, Siofra River
This spirit stag's attacks are pretty piece of cake to dodge. It will try to ram y'all with its horns and perform slow breath attacks, both on the ground and flight in the air. The main attack to be aware of is its two midair hops earlier slamming its head down on y'all. It's best to set on from backside to avoid those horns and only get under its legs to bargain some damage.
Spirit-Caller Snail
Difficulty: 🔥🔥
Reward: Glintstone Wizard Ashes
Location: Road's End Catacombs, Due west Liuria
Sounds like a weird boss name? Well, it's a weird boss! Imagine the Witch of Hemwick from Bloodborne, only equally an illusory snail who tin summon Crucible Knights to fight you. The central to this boss is: the snail is invisible. Summon a mob or NPC to distract the knight, while y'all locate the glowing patch of light, and bargain some damage to that shelled sucker.
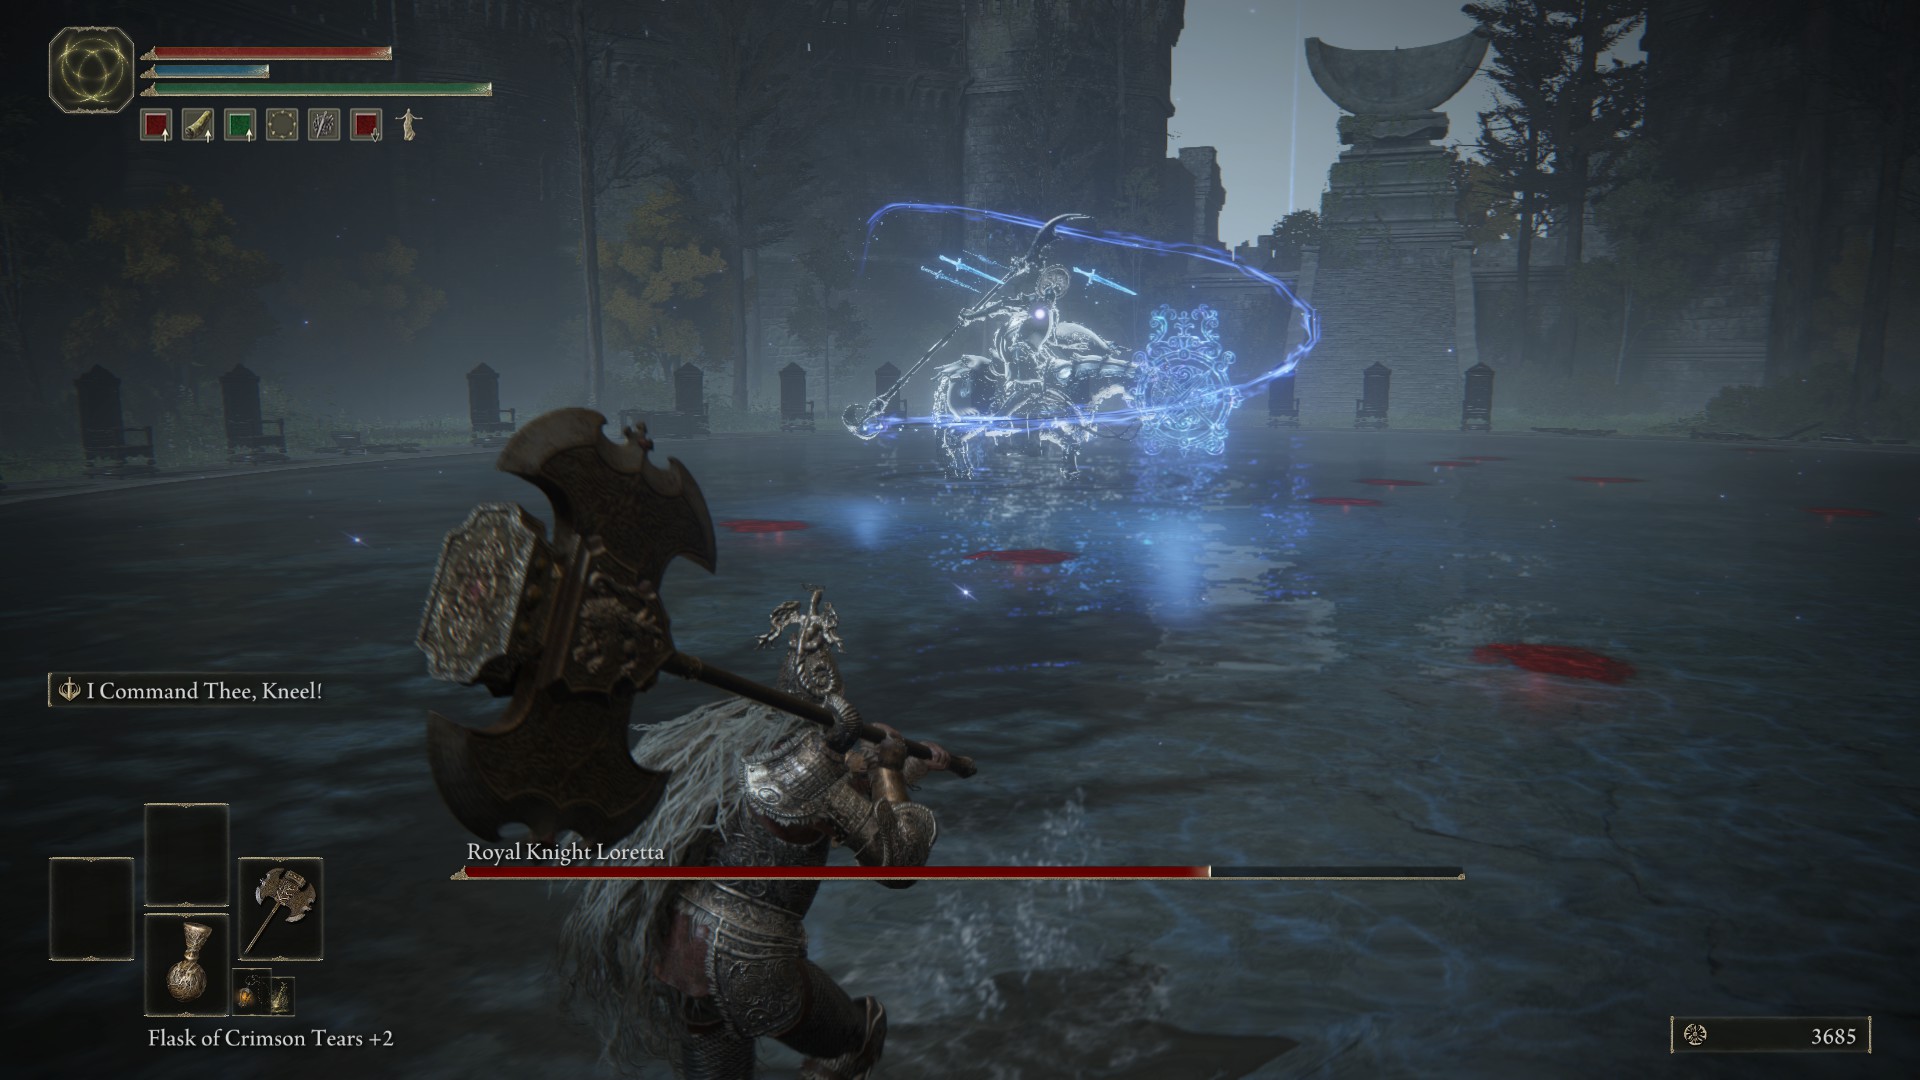
Regal Knight Loretta
Difficulty: 🔥🔥🔥
Reward: Loretta's Greatbow sorcery, Ash of War: Loretta's Slash
Location: Caria Manor, in the north of West Liuria
This mounted magic knight is a relatively tough fight due to her constantly spamming sorceries. She'll summon swords above her that will fire at you after a filibuster and domicile towards you, as well as magic missiles from the bottom of her halberd. These are relatively easy to contrivance if you continue your altitude. You can deal with her downward strike by dodging into her, so backside her—it'll confuse the third hit of her combo, and permit you hit her. Equally with other horse fights, her weak signal is the back of her horse, though be conscientious when it kicks.
At one-half health, her sorceries volition get worse: they'll be double the amount of swords, the magic missiles volition be clusters, and she'll burn a bigger, faster missile with a long windup. Since these home, dodge at the final minute to avoid, so get in hits when you lot can, earlier retreating back to a safe distance.
Demi-Human Queen Gilika
Difficulty: 🔥🔥
Advantage: Ritual Sword Talisman in the room behind her
Location: Lux Ruins, Altus Plateau
She may be the queen of the demi-humans, only this wolf-like giant actually isn't that tough. Y'all tin can discover her in the basement of the Lux Ruins, which are due n of where the Grand Lift of Dectus comes out on the Altus Plateau. She'll be fairly relaxed to brainstorm with, so deal lots of damage, and when she starts jumping around get under her legs to hit her some more. But make sure to sentry out for her down smash attacks.
Sanguine Noble
Difficulty: 🔥🔥
Rewards: Bloody Helice sword
Location: Writheblood Ruins, Altus Plateau
You can discover this rapier wielding bleed principal in the basement of the Writheblood Ruins. It sits on the western cliffs overlooking that spooky forest in the north. Beware of claret-loss buildup in this fight and his AoE pool that causes information technology. Also watch out for his speedy attacks and thrown missiles. I recommend summoning wolves, since he struggles to deal with split aggro, and you can all just lay in on him
Source: https://www.pcgamer.com/elden-ring-bosses-locations/
0 Response to "The Over the Hill Gang Rides Again Cast"
ارسال یک نظر